Linux Commands/Procedures
00001
Tarring, Gzipping, Untarring, Ungzipping, etc. Examples
tar -xvzf filename.tar.gz (untars and ungzips the "filename.tar.gz" file) - PDW 11/6/02
or
gunzip < filename.tar.gz | tar xvf
(I've never tried this method, but
in case the other fails ...)
tar -xvzf filename.tgz (untars and ungzips the "filename.tgz" file)
---
bzcat filename.tar.bz2 | tar -xv (untars and unbzips the "filename.tar.bz2" file)
or
tar -xjvf filename.tar.bz2 (does the same)
To extract a *.tar.xz file: tar -xpvf filename.tar.xz (also works for *.tar.gz files)
---
Some tar programs (most of them nowadays but not all of them) are slightly
modified to be able to use bzip2 files directly using either the I or the
y tar parameter which works the same as the z tar parameter to handle gzip
archives.
---
tar -xvf filename.tar (untars the "filename.tar" file)
---
tar cvzf mydata.tgz mydata (tars and gzips the
"mydata" directory, including all sub-directories, into one file called
"mydata.tgz")
tar xvzf mydata.tgz (would untar and ungzip the
same. Be sure you are inside the parent directory you need to be to put
this directory back. E.g. - If the "mydata"
directory is located as below, be sure you are in the "/home/userme"
directory before tarring/untarring per the commands above.)
/---
|
/home---
/userme---
/mydata---
/goober
/gomer
/barney
To unzip a *.gz file, type: gunzip filename.gz
Q. How can I compress a whole directory under Linux / UNIX using a shell prompt?

A. It is very easy to compress a Whole Linux/UNIX directory. It is useful to backup files, email all files, or even to send software you have created to friends. Technically, it is called as a compressed archive. GNU tar command is best for this work. It can be used on remote Linux or UNIX server. It does two things for you:
=> Create the archive
=> Compress the archive

You need to use tar command as follows (syntax of tar command):
tar -zcvf archive-name.tar.gz directory-name
Where,

    -z: Compress archive using gzip program
    -c: Create archive
    -v: Verbose i.e display progress while creating archive
    -f: Archive File name

For example, you have directory called /home/jerry/prog and you would like to compress this directory then you can type tar command as follows:
$ tar -zcvf prog-1-jan-2005.tar.gz /home/jerry/prog

Above command will create an archive file called prog-1-jan-2005.tar.gz in current directory. If you wish to restore your archive then you need to use following command (it will extract all files in current directory):
$ tar -zxvf prog-1-jan-2005.tar.gz

Where,

    -x: Extract files

If you wish to extract files in particular directory, for example in /tmp then you need to use following command:
$ tar -zxvf prog-1-jan-2005.tar.gz -C /tmp
$ cd /tmp
$ ls -
------
------
00002
Unzipping and untarring tar.gz files
e.g. filename = filename_tar.gz
1. gunzip filename_tar.gz
2. tar -xvf filename_tar
01/26/06
To install a typical Linux app from a *.tar.gz after unpacking it, do this:
Change to the directory the unpacking process made.
Type: ./configure
Type: make
Type: make install
000004
000005
to shutdown shutdown -h now or
init 0
to reboot shutdown r now or init
6
000006
close stuck app. Ctrl+C (or CTRL+Z if nes.)
000007
To find any file:
find / -iname <name>
Add the -mount switch to avoid searching other mounted file systems
(e.g. Samba, Netware, vfat).
E.g.: find / -mount -iname goober*
( -name can be used, but iname removes the case-sensitiveness)
000008
find any file really fast slocate / -i filename where filename
is the name of the file (-i eliminates the case-sensitiveness)
000009
Close Xwindows Ctrl+Alt+Bkspc
000010
To mount a Dos floppy: mount -t vfat /dev/fd0 /floppy
000011
Left <Shift> at Lilo allows to boot to Dos (type "Dos")
000012
To prepare a floppy disk:
1. fdformat -n /dev/fd0H1440 or fdformat
-n /dev/fd0h1440
2. badblocks /dev/fd0H1440 1440 $>$ bad-blocks (or
/dev/fd0h1440)
3. mkfs -t ext2 -l bad-blocks /dev/fd0H1440 (or /dev/fd0h1440)
or
1. fdformat -n /dev/fd0H1440 (or /dev/fd0h1440)
2. mkfs -t ext2 -c /dev/fd0H1440 (or /dev/fd0h1440)
000013
To remove LILO from the primary hard drive:
1. Boot with a DOS disk and type: fdisk /mbr
or
2. Boot with Linux boot disk(s) and type: dd if=/dev/zero
of=/dev/hda
On my 60Gig drive it took roughly 8.5 to 9 hours.
I suspect this is a low-level format or the equivalent. (This method
obviously takes longer, but may be more thorough)
000014
To remove Linux format from a floppy disk, type: dd if=/dev/zero
of=/dev/fd0
000015
To see a list of devices that have been compiled in or loaded: cat
/proc/devices
000016
To see a calendar:
cal displays the current month calendar
cal 2001 | more displays the whole year of 2001 one screen
at a time
cal 6 1952 displays the month of June from 1952
000017
To see what version the kernel is type: kernelversion
000018
To see what version of Linux it is type: uname -sr
000019
To make a bootdisk with Redhat: (not sure how well this works)
1. Type: uname -sr to show the current version of
Linux
2. put blank disk in floppy A:
3. Type: mkbootdisk -device /dev/fd0
2.x.x-x.x (where 2.x.x-x.x is the version number from step
1)
000020
To make a boot disk
#~ dd if=/boot/vmlinuz-2.0.36-0.7 of=/dev/fd0 # use your
kernel image
#~ rdev /dev/fd0
/dev/hda2
#
your
Linux partition
000021
To make a boot disk from scratch:
1. Change to the root directory and type: mkdir /bf ("bf"
stands for "Boot Floppy")
2. Type: dd if=/dev/zero of=/tmp/fsfile bs=1k count=4000
(This makes a file/device called "fsfile" in /tmp that is about
4Mb in size with nothing in it.)
3. Type: mke2fs -m 0 -i 2000 /tmp/fsfile then type
"Y" for yes when asked if you want to proceed anyway. The "-i 2000"
should allow enough inodes for all the files that will need to be on the
boot disk.
4. Type: insmod loop
5. Type: mount -o loop -t ext2 /tmp/fsfile /bf
(NOTE: If you reboot the computer you will need to repeat steps 4 &
5.)
6. Change to /bf and make (mkdir) these directories: dev, proc,
etc, bin, sbin, lib, mnt, and usr
7. Copy files to the /bf/dev directory using this syntax: cp
-dpR /dev/fd0 /bf/dev/fd0
Here are the files to copy from /dev: fd0, hda, hdb, hdc, hde,
console, kmem, mem, null, ram0, tty1, tty2, tty3, tty4, and any others
you think you might need.
8. Copy files from /etc to /bf/etc. fstab, inittab, HOSTNAME,
profile (?), passwd, shadow, group, termcap (trim termcap down first).
NOTE: termcap, the terminal database, is typically several hundred
kilobytes. The version on your boot/root diskette should be pruned down
to contain only the terminal(s) you use, which is usually just the "linux"
or "linux-console" entry. (from "The Linux Bootdisk Howto") Once you are
in vi with termcap, determine the line numbers of the portion you need
(use <Ctrl>+G) then write these lines to a new file. The syntax
to do this is: :n,yw newfile where n is the beginning line
number, y is the ending line number, and newfile is the name of the new
file. Then delete the current termcap and rename the new file to
"termcap."
9. mkdir /bf/etc/rc.d and then cp -R /etc/rc.d/*
/bf/etc/rc.d
. . . (to be continued)
000022
To make a Slackware boot disk type: makebootdisk
000023
To configure Linux from the command prompt type: linuxconf
000024
To configure/setup Xwindows type: XF86Setup
or
To configure Xwindows (including video & monitor) type: Xconfigurator
Or
To configure/setup Xwindows type: xf86config
Or
To configure/setup Xwindows type: xorgconfig
Or
To configure/setup Xwindows (in RedHat 9 and possibly other versions) type: redhat-config-xfree86
The commands above are for older versions of Linux (mainly Redhat I believe).
In Fedora type: system-config-display --reconfig and follow instrucs as needed.
000025
To toggle between video modes in Xwindows - <Ctrl> + <Alt>
+ +
000026
To configure networking from a command prompt, type: netconfig
000027
To configure networking from Xwindows, open an Xterm session and type:
control-panel
000028
To remove LILO & prepare hard drive for Fdisk:
1. Boot with bootable Linux floppy (e.g. Slackware "boot" disk and
"color" disk or "boot" & "root"). If necessary make a boot disk
with Rawrite and a boot disk image.
2. Type: dd if=/dev/zero of=/dev/hda
3. Wait. This takes quite a while even on a 1Gig hard drive.
000029
To install a linux application:
1. copy the application install file to a temp directory (e.g.
cp linuxapp-1.1.tgz /temp)
2. move to that temp directory and unzip the file (.e.g. cd /temp
then gunzip linuxapp-1.1.tgz)
3. untar the unzipped file (e.g. tar -xvf linuxapp-1.1.tar)
4. type: make (if the instructions that came with the app
say to do this. Check for a readme file)
000030
To enable NumLock on by default, add these lines to /etc/rc.d/rc.sysinit:
for tty in /dev/tty[1-9]*; do
setleds -D +num < $tty
done
000031
To configure a service to start or stop during bootup (from the command line) in RedHat or Fedora use:
ntsysv
OR (12/19/08)
Use the chkconfig command (e.g. "chkconfig sendmail off" to keep the sendmail service from starting).
(The chkconfig command can also be used to change the runlevel a
particular service runs in. Use the "man chkconfig" command for
details.)
0000032
To obtain a network number for Internet access for your network, request
a Network Address Application Form from hostmaster@internic.net
000033
To start SWAT for configuring SAMBA, open Netscape (or other browser)
and put
http://localhost:901 in the URL box. (i.e. browse to http://localhost:901
000034
TO find the IP address of your gateway type: netstat rn
To rescue a linux system: Boot from the Linux CD or create a boot
disk. Start in text mode and type: linux rescue at the boot prompt.
Then mount the root file system if possible.
To get the Texinfo manual for a linux command, type: info command
(e.g. info ls)
To boot automatically into Xwindows (Gnome or KDE): Edit the /etc/inittab
file. The line id:5:initdefault: should use 5 for Xwindows or
3 to boot to command prompt.
To copy the Linux boot sector to an NT partition (assumes the loader
is not on the MBR, because NT is) on C:\bootsect.Lnx, type: dd if=/dev/hda2
of=bootsect.Lnx bs=512 count=1 (where hda2 is the Linux partition).
Copy the bootsect.Lnx to a common location (floppy disk?), reboot into
Windows, and copy the bootsect.Lnx to C:\. Then edit the Boot.ini
file on the NT partition and add the line: C:\bootsect.Lnx = Linux
000035
To restart Samba on a Red Hat box after changing smb.conf file, type: /etc/rc.d/init.d/smb restart or service smb restart
On a Debian/Knoppix box, type: /etc/init.d/samba restart
000036
To map a drive from the linux box to a share on a Windows box (this
assumes samba is configured correctly and you have created the /mnt/directory
on the linux box), type:
smbmount //server/share /mnt/directory o username=lanID where
server is the name of the Windows server (netbios name), share is the
name of the share on the Windows server, directory is the name of the
directory youve already created on the linux box, and lanID is the name
of the lan account on the Windows domain/workgroup.
You can also try the regular "mount" command with "smbfs" as the
filetype. E.g. mount -t smbfs //remoteserver2/folder /mnt/mywinfolder.
000037
To list the shares available on another box (server or workstation),
type: smbclient -L othername where othername
is the name of the server/workstation you are looking for shares on.
(e.g. smbclient L Computer2 will list the shares on the
Computer2 PC.
To get a more comprehensive list add "-U username" to the command
above, where username is the/an account name from the box you are
looking for shares on. (e.g. smbclient L Computer22
will list the shares on the
"Computer2" PC.
000038
To find particular text in a group of files in one directory, go to
that directory and type: grep text *
000039
To load linux from a DOS prompt, first be sure the machine was booted
to DOS, not just using a DOS prompt from an Open Windows session.
In other words, boot to DOS. Copy the vmlinuz file from your Linux
partition (youll have to do this from within Linux [or use a utility like
explore2fs.exe]) to your DOS partition and also copy the loadlin.exe
file to the same location. Now boot to a DOS prompt (if not already),
go to the directory with the vmlinuz and loadlin.exe files and type:
loadlin c:\path\vmlinuz root=/dev/hda2 ro where c:\path
is the path to the directory vmlinuz and loadlin.exe are in, and hda2
is the partition that Linux is on.
000040
To mount an NDS Netware server type:
ipx_configure auto_interface=on auto_primary=on
ncpmount S Servername /mnt/localdirectory -U username.context.on.tree
(Where Servername is the name of the particular Netware server, /mnt/directory
is the local directory on the Linux PC you want to mount to, and username.context.on.tree
is the fully qualified username and context on the Netware tree.
000041
To open multiple Xwindows terminals on one PC:
1. Open the first by typing: startx
2. Open a terminal (e.g. xterm) once in Xwindows
3. Type: startx -- :1 (to open Xwindows on a 2nd display)
4. Use the keybd combo <Ctrl>+<Alt>+<F7> to switch back
to display 1, then from display 1 use <Ctrl>+<Alt>+<F8> to switch
to display 2. (You can use up to 5 Xwindows displays at one time.
Therefore 0 = <F7>, 1 = <F8>, 2 = <F9>, etc. through 5 = <F11>.)
000042
To update to a new Linux kernel, here are the general steps involved.
Be sure to read any README files or instruction files that come with the
new kernel. ALSO BE SURE YOU HAVE A BOOT DISK WITH THE EXISTING KERNEL!!!
1. Download the new kernel of choice from www.kernel.org
2. Copy it to /usr/src (unless your particular Linux distribution
uses a different location for the source files)
3. unzip it
4. Rename an existing linux directory if it exists or remove the
linux link if it exists. The next step will create a new directory
here, named linux.
5. run tar xvf on the unzipped *.tar file.
6. move to the new linux directory that was created.
7. run make menuconfig or make config or from Xwindows run make
xconfig. You will need to choose all the options you want as a part
of the kernel and mark items you want as modules.
8. Run make dep
9. Run make clean
10. Run make bzImage if the kernel is larger (probably any newer
ones are) or male zImage for smaller kernels (e.g. for a specialized
boot disk).
11. Run make modules if you chose to create any modules.
12. Run make modules_install if you did step 11.
13. Copy the new bzImage file (or zImage) file from /usr/src/linux/arch/i386/boot
to the location the existing kernel is in (e.g. In Slakware it is in the
root /, and in RedHat 7.2 it is in the /boot directory.).
If not sure, type cat /etc/lilo.conf to see where it is.
14. Back up the /etc/lilo.conf file and then edit it to point to the
new kernel. (e.g. The line in my current RedHat 7.2 lilo.conf says:
image=/boot/vmlinuz-2.4.7-10 whereas the new line might need to be
changed to image=/boot/bzImage.)
15. Run the lilo command to update Lilo.
16. Reboot
17. Test, test, test.
18. Make a new bootdisk with mkbootdisk or whatever method you use.
000043
To recreate a new Xwindows session for a particular account:
On my RedHat 7.2 workstation at the office I did this:
1. userdel r u418044 (removed the u418044 account and some
associated directories)
2. adduser u418044
3. passwd u418044
4. cd /tmp
5. rm R orbit-u418044/
6. login to other session with new u418044 account
7. startx
For the Desktop4 account I removed some steps from above and did this:
1.Deleted all files and directories in /home/Desktop4 except:
.kde (directory)
.xemacs (directory)
.bash_logout
.bash_profile
.bashrc
.emacs
.screenrc
.gtkrc
.canna
.zshrc
2.Deleted the /tmp/orbit-Desktop4 directory (cd /tmp, rm R orbit-Desktop4)
000044
To create a symbolic link type: ln s /existing/source/file/or/directory
targetname
where /existing/source/file/or/directory is the existing source file
or directory that you want to make a link to, and targetname is the name
of the link (shortcut). To make a link to a Novell mount, dont make
the targetname directory, but let the ln command do this. To make
a link of /home/u418044/chip01 to the /mnt/chip01/vol1/USERS/u418044
(my current G: drive on my Windows boxes), be sure there is no existing
/home/u418044/chip01 directory (umount the exisiting Novell mount point
if necessary), be sure to be logged in to the Redhat box with the u418044
account, then type: ln s /mnt/chip01/vol1/USERS/u418044/ /home/u418044/chip01
(make sure to add the / at the end of the USERS/u418044/)
To remove a symbolic link , be sure you have the access rights necessary,
then type: rm f targetname or
rmdir targetname if the targetname is a directory and
not a file (you may need to remove files from the directory first too).
000045
To edit the /etc/passwd file use the vipw command.
To edit the /etc/group file use the vigr command.
000046
To change the hostname of a Redhat linux PC:
1. type: hostname nameuwant
(where nameuwant is the name you want to use as the hostname)
2. Edit the /etc/hosts file with a line with your IP address and the
new hostname. (Note this will only work permanently on a PC that
is configured with a static IP address. If the system is configured
to lease an IP address from DHCP, you will need to re-edit the hosts files
every time the IP address changes.
3. I believe (tested on one PC at work) that if you are receiving your
IP from DHCP you may be able to edit the HOSTNAME= line in the /etc/sysconfig/network
filewith the hostname you desire and take the hostname out of the /etc/hosts
file.
000047
10/06/07
To change the hostname on a Debian linux PC:
Run the "hostname" command and add the new name on the end of the command
(e.g. "hostname computer14"). (I wouldn't be surprised if you could skip this step.
Just haven't tested as of this writing.)
Edit the /etc/hostname file and replace the current name with that same new name.
Edit the /etc/hosts file and put the new hostname at the end of the "127.0.0.1 localhost" line. (e.g. 127.0.0.1 localhost newhost,)
Type: "/etc/init.d/hostname.sh start" to make the change active.
It should stay even after a reboot now.
000048
To find the particular brand of Linux (e.g. Redhat 7.2 vs. Slackware
3.5, etc) try typing: cat /etc/issue
000049
To change the ownership of a file/directory use the chown command.
e.g. chown johnsmith goober.txt
- Changes the ownership of the goober.txt file to the johnsmith
account.
chown
root.daemon /mydir - Changes the ownership
of the /mydir directory to root and the group it belongs to, to the daemon
group.
000050
To configure a printer from the command prompt, type printconf-tui
and follow the prompts for setting up the printer. For a typical
Novell printer with a JetDirect card and an IP address, pick the Jet Direct
option and type in the IP address when prompted. (The default port
of 9100 seems to work in the office.)
000051
To print from a command prompt type: lpr filename
where filename is the name of the file you are trying to print.
or
To print from the command prompt to a non-default printer type:
lpr -P printername filename where printername is the
name of the non-default printer. You can find the names of the available
printers in the /etc/printcap file. The first line in each section
has the printer name.
000052
To make cls work on my Redhat boxes just like the clear command
I put an alias line in the appropriate .bashrc script file. For
instance, in the /home/u418044/.bashrc file I added a line: alias
cls=clear . This way all I had to do was log out and back in for
the alias to work. BUT, to make this alias applicable to all users,
I added the same line to the /etc/bashrc (notice there is no . in front
of the bashrc in the /etc directory like there is in the users /home
directory.
Another way to set this up so it applies to all users is to put the
same alias line in the /etc/rc.d/rc.local file. This is probably
a preferred a method.
000053
Directory structure of initialization scripts:
000054
To install modules manually you can use: insmod modulename
where modulename is the name of the particular module.
To install the module so that it is removed from memory while not being
used, type : insmod k modulename
To install a module and any modules it is dependant on, use:
modprobe modulename This is generally
the safer way to install a module manually.
000055
In Linux, to list modules currently loaded, type: lsmod
000056
to filter out the comments in a .config file after doing a make menuconfig
(while preparing to compile a new kernel) type: egrep "=n$|=m$|=y$"
000057
To see the bootup messages and/or find out info about the system hardware,
type: dmesg | more
000058
To install an external Parallel port Zip drive:
1. compile the kernel with the ppa module or built-in support for scsi
Iomega parralel
2. type: insmod ppa or
modprobe ppa
3. Make a directory for the mount point if needed. (.e.g. Mkdir
/mnt/zip)
4. Put a zip disk in the drive.
5. Mount it (e.g. Mount -t vfat /dev/sda4 /mnt/zip)
6. Enjoy.
7. You might want to add the command in item 2 to a startup script
(e.g. /etc/bashrc). And maybe the mount command too.
000059
To archive/backup a directory from its parent directory, type:
tar cvf /targetdir/targetfile.tar ./sourcedir
where targetdir is the directory you are storing the archive in, targetfile
is the name of the archive file, and sourcedir is the name of the directory
you are archiving/backing up. (Note: by default all the sub-directories
inside of sourcedir will be archived too.
To zip the archive at the same time, add the z option (e.g. tar czvf
/targetdir/targetfile.tar.gz ./sourcedir). I use this to backup
my /etc directory to Zip disk. With my Zip drive mounted to /mnt/zip,
from the root directory I type: tar czvf /mnt/zip/etc_bkup.tar.gz
/etc
000060
To create a swap partition:
1. Use fdisk to create a partition. (The general rule of thumb
is to make a swap partition twice the size of your installed ram.)
2. type: mkswap /dev/hdb2 (where /dev/hdb2
is the partition you made with fdisk)
3. type: swapon /dev/hdb2
OR
The instructions below were taken from Mulinux FAQs web page. (http://mulinux.sunsite.dk/mu/faq/faq-5.html#ss5.4)
I have NO idea if they will work.
# .... mount a DOS disk ...
# dd if=/dev/zero bs=1k count=4000 of=linux.swp
# mkswap linux.swp
# sync
# swapon linux.swp
000061
To speed the system up a bit (especially full hard drive searches)
I replaced the defaults options on a couple of mounts/partitions in the
/etc/fstab file with noauto,owner. This way these partitions are
not mounted by default and therefore are not include in searches, etc.
But when needed, they can be mounted simply with the mount command referring
to their mount points.
e.g. The line below in the /etc/fstab file allows me to type:
mount /mnt/Win95 when I need the partition.
/dev/hda1
/mnt/Win95
vfat noauto,owner 0 0
000062
To switch between Xwindows windows managers (e.g. between Gnome and
KDE) use the switchdesk command. You can use it from the command
prompt or from within Xwindows. The syntax from the command prompt
is: switchdesk NAMEWM where NAMEWM is the
name of the Xwindow manager (KDE, GNOME, etc.) Beware though, if you use
the command with a manager that is not installed you may not be able to
get Xwindows to open properly. I tried: switchdesk GNOME
on one of my RedHat boxes and it gave me no error message, but would not
open Xwindows until I switched it back with switchdesk KDE.
Then from within KDE I ran switchdesk and it gave me the option between
KDE and TWM, but when I closed Xwindows and restarted, it never loaded
properly. After I ran switchdesk KDE again from the command line
and then startx, it still failed to load. I had to remove the /root/.Xclient
file and then startx opened KDE ok.
OR
(5/26/03) Edit the /etc/sysconfig/desktop file for the desktop
of your choice. The file has one line: DESKTOP=KDE
Thats it. So for me, its going to be either: DESKTOP=KDE
or DESKTOP=GNOME
000063
To install an RPM package (install an application with a *.rpm extension).
Type: rpm -ivh filename-x.x.i386.rpm
To see a list of rpm packages that have been installed, type: rpm
-qa or rpm -qa | more
To see if a specific rpm package has been installed, type:
rpm -qa | grep pkgname where pkgname is that
name of the package or the first few characters of the package name.
To remove a specific rpm package, first do a rpm -qa | grep partofname
where partofname is part of the package name for grep to work with.
Then type: rpm -e rpmpkgname where rpmpkgname is
the name of the package as it showed up for the query above. If you
use the original filename of the rpm package you used to install with,
you will typically get an error like: rpm not installed.
This is because the package name is not necessarily identical to the
rpm filename. (e.g. filename = glibc-2.2.4-13.rpm
package name = glibc-2.2.4-13)
000064
To copy an image of one IDE hard drive to another of the same size,
do this:
1. Connect the two equal size drives with the source as the master
drive on IDE1and the target as the master on IDE2. (source = hda,
target = hdc)
2. Boot with a linux floppy boot disk in A:
3. From the Linux prompt type: dd if=/dev/hda of=/dev/hdc bs=8192
and wait (1gig drives took me about 20 minutes)
You can use the bs= switch to increase the byte size being used thus
speeding up the process, if you know what size to use.
or
To copy an image of a linux hard drive from one hard drive to another
of equal or larger size, do this:
1. partition the second drive so it has the same number and type of
partitions, and in the same order.
2. Configure the source drive as the master on IDE1 and the target
as master on IDE2.
3. Boot with the configuration above.
4. format the partitions on the target as needed (see my written notes
from this and update this info)
5. Make the linux files systems as needed on the formatted drive(s)
(see my written notes from this and update this info)
6. Use the cp command (see my written notes from this and update this
info)
to copy all the directories from source to target with the exception
of /proc, lost+found, and ???
7. Shutdown and reconfigure so target drive is the master on IDE1 and
remove the source.
8. Boot with a linux boot disk and reinitialize LILO or Grub.
000065
To reintialize the /etc/exports file after editing, type: exportfs
-ra
000066
To open a man page in KDE, open a browser and type #commandname in
the URL box, where commandname is the name of the command you want to
see the man page for. Not sure if this works for Gnome or specific
to KDE.
000067
To configure the sound card, use the sndconfig command and follow the
prompts.
000068
Re-Initializing the Grub Boot Loader in Linux after Installing Windows
98.
I had my Redhat 7.2 System set up to dual-boot to RedHat 7.2 (default)
and a commnand prompt version
of Windows 98. (The first partition on the hard drive was a Win98
partition without a full install of Windows
98. Instead I formatted it with "format /s" from a bootable Win98
floppy disk.) The second partition was
RedHat 7.2 with the Grub boot loader.
When I finally decided to install a full version of Windows 98,
once I was done it only booted to
Windows 98 and never gave me my Grub dual-boot menu. Fortunately
I had prepared by creating a bootdisk for
RedHat. So here are the steps I took to recover my nice Grub
dual-boot menu.
1. Booted with the RedHat boot disk.
2. Logged in as root.
3. typed: grub (This gave me the "grub>" prompt.)
4. typed: find /boot/grub/stage1 (Which gave me the result of
"(hd0,1)")
5. typed: root (hd0,1)
6. typed: setup (hd0)
The way I interpretted this is that the results of line 4 told
me what parameters to use in lines 5
and 6.
Paul W. 10/21/02
Additional Info: (12/23/05)
On another of my systems that was a quad-boot system, from the grub> prompt I typed:
"find /boot/grub/stage1" Which gave me the result of:
"(hd0,1)"
"(hd0,6)"
I already knew the partition I was using the /etc/grub.conf file from was hda7,
therefore (hd0,6) to grub. So after the command above I typed:
"root (hd0,6)" to point to the root on hda7 and then:
"setup (hd0)" to setup grub on the MBR of hda.
000069
Here are three different ways to make a zero byte file:
touch filename (makes a file named "filename" with nothing in it)
/dev/null > filename
"
> filename
"
e.g. > /tmp/goober.txt
makes a zero byte file named
"goober.txt" in the /tmp directory.
000070
TO use vncserver/vncviewer between a Linux box and Windows box:
1. From the Linux command line type: vncserver :0 and enter
a password when asked. ( The :0 represents the display number.
You can start more than one remote session at a time, e.g. vncserver
:0 and vncserver :1)
2. From the Windows box start the Vncviewer applet and type in the
computer hostname followed by :0 or whatever the display number is.
E.g. Computer1:0 . Then type in the password you set for this
remote session.
Note: These instructions assume you have both PCs on the same network
and you have the Vncserver/Vncviewer apps install on the two workstations
(Redhat 8 and 9 came with these by default).
000003
To shut down the vncserver on the Linux box, type: vncserver -kill :x (where x is the number of the display; typically :0)
000071
To see a list of services that are running type: service status-all
To scroll one screen at a time you will need to redirect the output
to a file and then use the more command. E.g.:
service status-all > servicestatus.txt
more servicestatus.txt
000072
To restart network services type: service xinetd restart
000073
To restart network settings without rebooting after making changes
you might try: service network restart
000074
To monitor processes use the top command. Just type:
top
When done monitoring, type the letter q to quit.
To monitor cpu usage use this: ps -ea --format '%cpu pid user cmd stime'
--sort '%cpu'
000075
To temporarily use the root account with it's environment settings
type: su - The " -" gives you the particular user's
environment
settings, in this case root's settings. This is helpful since
just the "su" command by itself will not give the $PATH variable, therefore
not
giving access to all the executable's you might need.
000076
To remote to a Windows NT/2000 server, Win2000 workstation, or WinXP
workstation, type: rdesktop xxx.xxx.xxx.xxx where xxx.xxx.xxx.xxx
is the IP address of the remote Windows box.
000077
To image a hard drive using the dd command. Example: My
linux box has the hda1 partition as the main partition. I had a Samba
share on the Igsvnh007e box named temp. I mounted the share to
my /igsvnh007e directory on the linux box with the hda1 partition.
To image the main partition of a linux box to this share, from the prompt
on the box I was imaging, I typed:
dd if=/dev/hda1 of=/igsvnh007e/cpq466.img bs=1048576 count=1500
This took about an hour or hour and a half. Then to finish I
typed:
dd if=/dev/hda1 bs=1048576 skip=1500 of=/igsvnh007e/cpq466_b.img
I had to separate the image into two separate files this way because
the particular kernel limited me to file sizes under 2gigs and the partition
was over 2gigs. Though I havent tried restoring this yet, I believe
the commands I need to use would be these:
dd if=/igsvnh007e/cpq466.img of=/dev/hda1
then,
dd if=/igsvnh007e/cpq466_b.img /dev/hda1 bs=1048576 count=1500
Obviously if the image files have been moved to another location other
than /igsvnh007e you would need to use that location in the commands above.
000078
To get the 3Com 3c509 card working on my RedHat 5.2 box I had to boot
with a DOS boot disk, run the 3Com utility 3c5x9cfg.exe, disable the
Plug and Play, power down the PC, and reboot. Once the system finished
booting with RedHat 5.2, I typed:
modprobe 3c509
Then once this module was loaded I had to get it working on the network
by typing:
/etc/rc.d/init.d/network restart
000079
Creating A Ramdisk
1. Create a directory for the mount point to come. - mkdir /mnt/ramdisk
2. Zero out the ram device - dd if=/dev/zero of=/dev/ram0
count=2000 bs=1024
3. Create an ext2 filesystem on it. - mke2fs /dev/ram0
4. Mount it. - mount /dev/ram0 /mnt/ramdisk
5. Allow anyone to use it. - chmod 777 /mnt/ramdisk
OR
Use the ramdisk.sh shell script
000080
To configure a modem from the command prompt in RedHat 7.2 I used the
modemconf command and followed the instrucs.
000081
Some of the typical start-up configuration files are:
/etc/rc.local
/etc/bashrc
/etc/rc
/etc/inittab
/etc/sysconfig/network
000082
To set up networking on a RedHat 7.2 box manually with a 3Com 3c509
NIC, I took these steps: (This was a bare minimum install initially
for a stand-alone workstation so I had not chosen to set up networking
originally)
1. modprobe 3c509
2. edited the /etc/modules.conf by adding this line: alias eth0
3c509
3. edited the /etc/resolv.conf to match the same file on my other linux
boxes on my home network
domain Mydomain.com
nameserver 192.168.1.4
4. edited the /etc/sysconfig/network file to this:
NETWORKING=yes
HOSTNAME=Computer01
5. created the file /etc/sysconfig/network-scripts/ifcfg-eth0 that
had this:
DEVICE=eth0
BOOTPROTO=dhcp
ONBOOT=yes
6. typed this to restart the networking:
/etc/rc.d/init.d/network restart
Note: I did notice the /etc/resolv.conf file got re-written in the process.
This is a known issue with 7.2 and 8.0. To fix this, find the "/sbin/dhcpcd"
command in the /sbin/ifup script and add the "-R". An alternative
work-around would be to create a good version of the resolv.conf file with
a different name and add a line to the /etc/rc.d/rc.local startup script
that copies the good version over the bad version. PDW 1/18/03
000083
To create another account with root privileges and mirrored after the
root account I took these steps:
1. Logged in as root.
2. Created the account (e.g. superguy) and set the password for that
account.
3. Used the usermod command like this:
usermod G bin,daemon,sys,adm,disk,wheel,root,superguy superguy
4. Edited the /etc/passwd file with the vipw command and changed the
line:
root2:09NZthcPUPzK2:501:501::/home/superguy:/bin/bash
to:
root2:09NZthcPUPzK2:0:0:root:/home/superguy:/bin/bash
5. Copied these files from /root to /home/superguy (used KDE with hidden
files shown) :
.bashrc
.bash_profile
.cshrc
000084
To autostart a specific application when KDE starts up, drag and drop
the particular shortcut into the /home/userid/.kde/autostart directory,
where userid is the particular username.
000085
To add swap space:
If you have an unused partition (e.g. /dev/hda5) do this:
1. Use fdisk to configure the unused partition to the size you
want and as a Swap type (82).
2. run the mkswap command (e.g. mkswap /dev/hda5 )
3. run the swapon command (e.g. swapon)
4. edit the /etc/fstab file and add a line for this swap partition
(e.g. /dev/hda5 swap
swap defaults 0 0)
To use extra space on an exisiting partition do this to make a 128mg
swap file:
dd if=/dev/zero of=swapfile bs=1024 count=132207
chmod 600 swapfile
mkswap swapfile
000086
To make high density DOS disks from linux type:
Fdformat /dev/fd0u1722
Mkfs t vfat /dev/fd0u1722
You can use fd0u1680 instead of fd0u1722 if you prefer.
NOTE: In limited experimentation I could not get a Windows machine
to recognize these disks if I formatted with msdos type, but it did work
with vfat type.
000087
To copy pictures from a digital camera do this:
1. Connect the camera to the PC via the provided USB cable.
2. Turn the camera on.
3. Create a directory you will use for the mount point (e.g.
mkdir /mnt/camera)
4. Mount with this command mount /dev/sda1 /mnt/camera
(where /mnt/camera is whatever the directory you made in step 3.)
5. You may get some info displayed on the screen about USB stuff, but
now you should have the pictures on the camera available in /mnt/camera
(or where ever).
6. When you are finished, type umount /mnt/camera (or whatever), then
turn camera off and disconnect.
000088
To temporarily use FTP on Linux box at office, do this:
1. logon to Linux box with root account
2. type: ntsysv
3. check the wu-ftpd item and exit
4. type: service xinetd restart
5. do your ftp'ing as needed then repeat steps 1-4 only UNcheck wu-ftpd.
000089
8/13/04
To mount a CDRom disk while using Tom's RTBT Linux boot disk, type:
mount -t iso9660 /dev/hdc /cdrom
(This assumes the CDRom drive is the primary device on the second IDE interface.
If it is the slave drive on IDE1, try using /dev/hda2 instead.)
000090
8/14/04
Here is how I created an image of a Win98 drive with Linux and then
copied that image to another drive (in this case smaller than the
original).
1. Here are the drives I used and how I had them configured in the PC.
Source drive = 2Gig as Master on IDE1 (C:)
Utility drive = 1Gig as Slave on IDE1 (D:)
Target drive = 1Gig as Master on IDE2 (E:)
2. I booted with a "Parted" Linux boot disk and reduced the size
of the source disk to just a few megs over the total size of the data
on the disk.
3. I rebooted with a "Tom's RTBT" Linux boot disk.
4. Created temp directories to use for mount points to mount the drives.
mkdir /hda And mkdir /hdb
mount -t vfat /dev/hda1 /hda And mount -t vfat /dev/hdb1 /hdb
5. To create the image of the C: drive to a file on the D: drive I typed:
dd if=/dev/hda1 of=/hdb/imagename.img bs=10485760 ("imagename.img"
is any name you want to give to the image file. The "bs=10485760" parameter makes it copy in chunks of 10Mb at a time.
This makes the creating of the image go a lot faster.)
6. I rebooted to DOS mode on the Win98 C: drive and used fdisk and format to make the E: drive a bootable Win98 drive.
7. Rebooted again with "Tom's RTBT" Linux boot disk.
8. Similar to step 4 I created a temp directory to use for a mount point for the D: drive (where the image file was).
mkdir /hdb
mount -t vfat /dev/hdb1 /hdb
9. Copied the image from the D: drive to the E: drive by typing:
dd if=/hdb/imagename.img of=/dev/hdc1 bs=10485760
10. Shutdown and moved the target drive to the Master drive on IDE1
11. I rebooted with a Win98 boot disk and had to sys the target drive which was, of course, now the C: drive.
12. After testing the newly imaged drive I shutdown, reconfigured the original 2Gig source drive, booted with the
"Parted" boot disk, and resized the drive back to it's full size.
000091
8/14/04
To do a "disk to disk" image follow these steps.
1. Configure the source drive as Master on IDE1 and the target drive as Master on IDE2.
2. If necessary, use the "Parted" Linux boot disk to reduxe the
size of the source drive to exactly the size of the target or less than
the size of the target.
3. Boot with a good Linux boot disk (currently I use Tom's RTBT disk) and use this command:
dd if=/dev/hda1 of=/dev/hdc1 bs=10485760
4. I don't believe I had to sys the target before using it like I did when using an image file instead of "disk to disk" method.
NOTE: Don't forget to resize your source drive back to it's proper size.
000092
10/02/04
To open a linux command man page quickly form within a KDE browser, type a pound sign (#) (hash mark)
and the name of the command you want help on, from any place you could normally type a URL address.
E.g. #mount in the "Location:" box of Konqueror would open the mount
man page.
Also, you can use the Alt+F2 combination to open a dialog box where you can enter the #command.
Note: This worked on my Redhat boxes and I think on my Slackware
box, but I do not see this working on my Debian boxes. (06/10/05)
000093
4/1/05
To make a blank password for a user account, edit the /etc/passwd
file on the line with the user ID. Remove the "x" from the field
between the user ID and the user number.
e.g.
goober:x:501:502:Guest:/home/goober:/bin/bash = before
goober::501:502:Goober Jones:/home/goober:/bin/bash) = after
000094
4/3/05
To change the behaviour of mouse clicks in KDE click/double-click
on the "Start Here" icon, go to "Peripherals", then Mouse, and choose
the settings you want.
OR
Click on the RedHat start button (lower left corner on taskbar),
then "Run Command...", type in "start-here:/", go to "Peripherals",
then Mouse, and choose the settings you want.
000095
~4/28/05
To activate an ftp server on a Slackware 10.1 box, I did this:
1. Logged in as root.
2. Edited the /etc/inetd.conf file and removed the rem (#) mark from one of the two available ftp server commands.
3. Typed: ps x to see what pid number inetd was using.
4. Typed: kill -HUP xxxx where "xxxx" is the pid number.
That did it! Here is a link to my inetd.conf file after I edited it. inetd.conf
000096
5/02/05
To install Knoppix to a hard drive from the Knoppix live CD do this:
1. From Xwindows do Ctrl+Alt+F2 to get to a command prompt.
2. Fdisk and format the drive if you want to first. You will have
the option to do this during the install process, but I did not test
this.
3. If you decide to fdisk/format during the install process, just type: sudo knoppix-installer (and follow the instrucs).
4. If you have already fdisked/formatted, type: IGNORE_CHECK=1 sudo knoppix-installer
5. Follow the step by step instrucs and that should do it. (I chose the "Debian-like" install option.)
NOTE:To use the latest
knoppix-installer replace the "knoppix-installer" command above with
"knoppix-installer-latest-web". PDW 09-14-05
000097
5/02/05
To install Puppy Linux onto a hard drive from the Puppy Live CD, use the "install-hd.sh" script from a root command prompt.
000098
05/27/05
To see what Debian packages have been installed type: dpkg --list name*
where "name" is a partial name of the package(s)
E.g. dpkg --list ftp* will show a list of ftp related packages already installed.
- - -
To install a Debian package (*.deb file) type: dpkg -i packagename.deb
- - -
To remove a Debian package (*.deb file) type: dpkg -r packagename.deb
- - -
To list all packages installed on a Redhat/Fedora system, type: rpm -qa
To search for a particular package installed on Redhat type: rpm -qa | grep packagename
000099
05/29/05
To download multiple files at one time and to use wildcards in the
process (using the command line ftp), use the "mget" command.
E.g. mget *htm *txt would
download all *htm and *txt files with one command.
The "mput" command works similarly to upload files.
000100
05/29/05
To operate the shell command from within the ftp command line
program, place a "!" in front of the command.
E.g. !clear would clear the
screen and place the prompt back up at the top.
000101
05/30/05
To install and configure the Proftp server on my Debian system I did this:
Downloaded the proftpd-1.3.0rc1.tar.gz file from www.proftpd.org
From the directory the file was in typed: tar xvzf proftpd-1.3.0rc1.tar.gz
Changed to the "proftpd-1.3.0rc1" directory that was created
Typed: ./configure (per instructions in the README file)
Typed: make (per instructions in the README file)
Typed: make install (per instructions in the README file)
Copied the "basic.conf" file from the "sample-configurations" directory to the "proftpd.conf"
file in /etc.
Added this line to the /etc/inetd.conf file:
ftp stream tcp nowait root
/usr/sbin/tcpd proftpd
Rebooted
000102
06/05/05
To make a particular account automatically start Xwindows upon logging in, I created
a ".profile" file in the particular home directory of that user id and made it like this:
# /etc/profile
startx
Theoretically if a ".profile" file already exists there, you should be
able to just add the "startx" command at the bottom of the file. Be
aware that the ".startx" command assumes no other user id currently has
an Xwindow session open on terminal "0" or will open one.
000103
06/05/05
To configure Openmosix correctly after installing it to a hard
drive from the live CD (see 5/02/05 item above) you will need to do two
things.
Create the "/mfs" directory.
Add this line to the /etc/fstab file:
mfs /mfs mfs dfsa=1 0 0
000104
07/08/05
To stop the Openmosixcollector once it is running, type: /etc/init.cd/openmosixcollector stop
To restart it again, type: /etc/init.cd/openmosix restart
000105
07/13/05
To use the default version of the Java Runtime Environment on my
newly installed Openmosix (Knoppix) box, in the installation of Open
Office, I had to point to "/usr/lib/j2se/1.4/jre" in the appropriate dialog box during the installation.
000106
07/28/05
To Determine what version of Debian Linux is installed on your PC,
open the /etc/debian_version file (it's a text file) and it will tell
you.
000107
08/17/05
To turn the numlock key on by default use the "setleds +num"
command in the appropriate script file for your version of Linux. For
Redhat I believe you would add this command to the /etc/bashrc (or
/home/userid/.bashrc to individualize it) and for Debian add it to the /etc/profile file (or /home/userid/.profile to indiv.).
NOTE: This only works outside of Xwindows. In fact when I set this up it results in an Xterminal error message: KDGETLED: Invalid argument
Error reading current led setting. Maybe stdin is not a VT?
It doesn't seem to hurt anything, but just shows up everytime you open a terminal session from within Xwindows.
000108
09/07/05
To see what version of Debian you currently have installed, look at the /etc/debian_version file. Type: cat /etc/debian_version
To see a list of all the debian packages (apps) installed, type: dpkg -l (that's a lower case "L")
To see a one line status of a particular package (e.g. "foo"), type: dpkg --list foo
If you don't know the exact name of the package try this (e.g. "ssh"): dpkg -l | grep ssh (that's a lower case "L" again)
On my current system this command gave these results:
ii  kdessh         3.2.3-1        KDE ssh frontend
ii  nxssh          1.3.99.1-0pre1 NoMachine NX - custom and modified OpenSSH
ii  ssh            3.8.1p1-8      Secure rlogin/rsh/rcp replacement (OpenSSH)
ii  sshstart-knopp 0.5-2          Starts SSH and sets a password for the knopp
To see a verbose description of a packages status (including version #), type: dpkg --status pkgname (e.g. dpkg --status ssh)
000109
09/10/05
Here is a copy of the /etc/grub.conf
file I edited to get all 4 OSes booting on my number 3 test box.
(Notice the syntax for hda5 and hda6. The syntax for Fedora was used by
the Fedora installation.) I installed Windows first, then OpenMosix
(Debian), which used Lilo to make the system dual-boot. Then I
installed SuSE which used Grub, but failed to recognize and add
OpenMosix to the menu. I figured out the correct syntax and added it to
the SuSE grub menu myself. Then I installed Fedora Core 3 and added the
other two Linux dists to the Grub menu at the appropriate time during
the Anaconda install, but they didn't boot properly afterwards. The
Fedora installation used the "rootnoverify (hd0,0) / chainloader +1"
syntax similar to the Windows menu item. So I copied the lines for SuSE
and OpenMosix from the SuSE /boot/grub/menu.lst file. Hope this will
help for future Grub menu editing.
Here is a list of the partitions on this drive and their respective OSes.
hda1 Windows 2000
hda2 fat32
hda3 swap
hda4 Extended
hda5 SuSE
hda6 Cluster Knoppix (Debian)
hda7 Fedora Core 3
000110
09/14/05
Here is a copy of the /etc/lilo.conf
file I edited to get all 3 OSes booting on my number 2 test box.
Windows 2000 was installed first on hda1. Hda2 is setup as the Linux
swap partition. Hda3 is the Windows Fat32 partiton to be shared by all
three OSes for storing data. Xandros was the second OS installed and is
on hda5 (hda4 is the extended partition and hda5 therefore the first
logical partition).
The Xandros install automatically detected the Windows 2000
partition and made an entry in the /etc/lilo.conf file. With lilo
installed to the MBR I could successfully dual-boot between Win2000 and
Xandros.
I then installed Cluster Knoppix (Debian) on hda6 using the
"knoppix-installer" script on the Cluster KNoppix live CD. It used the
Lilo bootloader by default and accurately detected the Windows 2000
partition and the Fat32 partition as well. It did not detect the
Xandros partition. The funny thing was, when I rebooted for the first
time, it did not boot with the Debian lilo configuration, but rather
the Xandros configuration still. I had expected the Debian install to
overwrite, so to speak, the Xandros lilo on hte MBR.
I edited the /etc/lilo.conf on hda5 (Debian) to add Debian to the
boot menu. Then I copied the appropriate version of /boot/vmlinuz...
kernel and /boot/initrd...img from hda6 to /boot on hda5 to coordinate
with the new entry in the lilo.conf file. I also renamed them to be
easier to distinguish. I ran the "lilo" command, rebooted, and tested
all ok.
Here is a list of the partitions on this drive and their respective OSes.
hda1 Windows 2000
hda2 fat32
hda3 swap
hda4 Extended
hda5 Xandros
hda6 Cluster Knoppix (Debian)
000111
10/01/05
Upgrading Debian systems
- To update the package list database (list of Debian applications already installed and available for install) type: apt-get update
- - - -
- To find the name of a package you want, type: apt-cache search string where string is a set of characters you think might be in the name of the package. (e.g. apt-cache search proftp will show various Debian packages related to the proftp application.)
(To do the same in Fedora, type: dnf search packagename)
- - - -
- To find out more info about a particular package, type: apt-cache show packagename
- - - -
- To find out more general info about a package, type: apt-cache showpkg packagename
- - - -
- To find out what other apps/packages a package depends on type: apt-cache depends packagename
- - - -
- To find out what package a particular file goes with, type: dpkg -S filename (You may very well get a list of packages since multiple packages may use the same file or a file with the same name.)
- - - -
- To find out what packages are already installed on your system, type: dpkg -l (That's a lower case "L".) (Add "| grep string" to narrow down the list - e.g. "dpkg -l | grep ftp" ) You may want to add "COLUMNS=132" in front of the dpkg command so you see all the info (e.g. "COLUMNS=132 dpkg -l | grep ftp")
- - - -
- To install a package, type: apt-get install packagename
You can specify packages to be removed on the same command line, as well. Just
put a '-' immediately after the name of the package to be removed, like this:
     # apt-get install nautilus gnome-panel-
     Reading Package Lists... Done
     Building Dependency Tree... Done
     The following extra packages will be installed:
       bonobo libmedusa0 libnautilus0
     The following packages will be REMOVED:
       gnome-applets gnome-panel gnome-panel-data gnome-session
     The following NEW packages will be installed:
       bonobo libmedusa0 libnautilus0 nautilus
     0 packages upgraded, 4 newly installed, 4 to remove and 1  not upgraded.
     Need to get 8329kB of archives. After unpacking 2594kB will be used.
     Do you want to continue? [Y/n]
- - - -
NOTE: See the 5/27/05 entry for installing a package with the dpkg command.
- - - -
- To upgrade a Debian distribution it is recommended to type: apt-get dist-upgrade
- - - -
- To remove a package, type: apt-get remove packagename (e.g. - apt-get remove proftpd)
Just as in the case of the install method, you can use a symbol
with remove to invert the meaning for a particular package. In
the case of removing, if you add a '+' right after the package
name, the package will be installed instead of being removed.
     # apt-get --purge remove gnome-panel nautilus+
     Reading Package Lists... Done
     Building Dependency Tree... Done
     The following extra packages will be installed:
       bonobo libmedusa0 libnautilus0 nautilus
     The following packages will be REMOVED:
       gnome-applets* gnome-panel* gnome-panel-data* gnome-session*
     The following NEW packages will be installed:
       bonobo libmedusa0 libnautilus0 nautilus
     0 packages upgraded, 4 newly installed, 4 to remove and 1  not upgraded.
     Need to get 8329kB of archives. After unpacking 2594kB will be used.
     Do you want to continue? [Y/n]
- - - -
- To remove a package and the associated configuration files, type: apt-get --purge remove packagename (e.g. - apt-get --purge remove proftpd)
- - - -
To clean up old Debian packages taking up space that are un-needed
go to a terminal session as root and use the apt-get autoremove command.
- - - -
- To ... type: apt-get packagename
The following options to apt-get may be useful:
     -h  This help text.
     -d  Download only - do NOT install or unpack archives
     -f  Attempt to continue if the integrity check fails
     -s  No-act. Perform ordering simulation
     -y  Assume Yes to all queries and do not prompt
     -u  Show a list of upgraded packages as well
000112
10/30/05
To configure a dual-boot system with Windows (drive C: [hda1]) and Puppy Linux (hdc1) do this:
1. Install Win98 on C: (hda1) first.
2. Reboot with Puppy CD in the drive and make sure BIOS is set to boot to CDRom drive.
3. Run the Start/Setup/Install Puppy Hard drive script (install-hd.sh)
4. Choose to install Puppy to /dev/hdc1
5. Choose to install Grub on MBR (I couldn't get it to initialize Grub properly, but got all the files in place.)
6. Reboot with the Puppy CD or Toms RTBT disk (or some other bootable Linux CD or disk)
7. Here is a copy of the /boot/Grub/menu.lst file from my /dev/hdc1
# This sets the default entry to boot.
# Remember that GRUB counts from 0, so 1 is the second entry.
default 0
# This sets the length of time in seconds that grub will wait for the user to select an OS
# before it boots the default on. I reccommend at least 15 seconds.
timeout 10
title Puppy Linux ver 1.0.5
kernel (hd1,0)/boot/vmlinuz root=/dev/hdc1 vga=normal noapm nodma noscsi
title Windows98se
root (hd0,0)
chainloader +1
makeactive
boot
8. Once booted you may need to mount /dev/hdc1 to a mount point you create.
9. Then type "grub" to enter the Grub shell.
10. From the grub> prompt type:
setup (hd0)
This should initialize the Grub bootloader to the MBR of hda (C:).
That should do it.
000113
11/11/05
To make configuration changes on a Redhat9 (I'm not sure what other
versions) from the command line, after the initial install process, use
the "setup" command. This will give you a menu to configure
authentication, firewall, mouse, network, printer, system (ntsysv), and
timezone.
000114
11/22/05
To mount an smb share on my Linux box by default I did this:
1. Made sure I had an account on both the Windows box and Linux box with the same ID and password.
2. Created a file called /root/.smbpasswd that had these two lines:
username=userid
password=userid_password
where "userid" is the common account name between the two boxes and "userid_password" is the corresponding password.
3. Changed the permissions on this file with: chmod 600 /root/.smbpasswd
4. Created a directory for the mount point (e.g. /windir )
5. Added this line to the /etc/fstab
//server/share /windir
smbfs credentials=/root/.smbpasswd
0 0
Where "//server/share" is the name of the Windows box and it's share and "/windir" is the name of your mount point.
000115
11/26/05
To release and renew the IP address do this:
ifdown eth0 (this releases current IP)
ifup eth0 (this renews IP)
(update 05/31/09)
You can also use: "ifconfig eth0 down" (to disable eth0) and
"ifconfig eth0 up" (to enable eth0).
000116
01/20/06
To send an email from a linux command prompt do this:
Type mail -s subject name@domain.xyz where
subject is what you want to appear in the recipient's subject box and
name@domain.xyz is the email address you want to send to. (e.g. mail -s Hello Dolly
dolly@madison.edu) (I hope this is a ficticious email address.)
Type the text of the email.
Press Enter so you are on a new line after finishing your text and then press Ctrl + D and Enter.
000117
02/07/06
To generate a Tripwire configuration file do this:
cd /etc/tripwire
twadmin --print-cfgfile > twcfg.txt
To generate a Tripwire active policy file do this:
cd /etc/tripwire
twadmin --print-polfile > twpol.txt
000118
02/19/06
To remote into a Vncserver using your web browser, type this in the URL box: http://ipaddress:580x
Where ipaddress is the IP address of the remote box (or use the DNS/Host name), and x is the number of the
Vnc server display number (typically 1).
000119
02/22/06
To re-use a previous command w/o using the up arrow (e.g. the command was several days ago and a couple hundred
commands ago), do this:
Type: history | grep partial where partial is enough of the command
to find it within the command history list.
Type: !xxx where xxx is the command number that was returned from
the command history list.
Press Enter to run the command.
000120
02/22/06
To play a *.wav file from a command prompt, use the "play" command. e.g. play barney.wav
(update 08/06/09) Another way to play a sound file from the command
line is with the "aplay" command. e.g. "aplay
/path/to/file/barneyfife.wav".
000110
03/04/06
To make the sshd start on bootup on my Darn Small Linux system I did this:
Logged in as root. Added one line to the /etc/rc5.d/S99bootlocal startup script.
The line was this: "/etc/init.d/ssh start"
000121
03/05/06
To verify a file with md5sum first be sure the file and the *.md5 file are in the same directory, then type
this:
md5sum -c filename.iso.md5 where "filename.iso.md5" is the name of the *.md5 verification file.
000122
03/05/06
To create a *.md5 verification file associated with an exisiting file type this:
md5sum filename.iso > filename.iso.md5 where "filename.iso" is the name of the
exisiting file and "filename.iso.md5" is the name of the verification file you are making.
000123
04/12/06 02/05/13 update (please see this document for more accurate info)
To share a directory on my Linux box with others using NFS, do this:
chmod xxx /directory
where "xxx" is the
permission mode you want and "/directory" is the directory you want to
share.
add this line to the /etc/exports file: /directory 192.168.x.x/24(rw,sync) where"192.168.x.x"
is the IP of your Linux box. Use the "tab" key to separate the two
items and make sure there are no spaces between the info in the second
item.
Add a line to the /etc/hosts.allow file: portmap: 192.168.x.
This time use
spaces to separate, not tab, and be sure to end with a period.
add this line to the /etc/hosts.deny file: portmap: ALL separate using spaces.
run this command: exportfs -vra the
"-vra" means "verbose", "recursive" (assuming you want all the sub-dirs
shared as well, and "all" (meaning all the directories in
/etc/exports).
To start the nfs service on a Redhat/Fedora box type: service nfs start
To stop the nfs service on a Redhat/Fedora box type: service nfs stop
To restart the nfs service on a Redhat/Fedora box type: service nfs restart
or
To start the nfs service type: /etc/rc.d/init.d/nfs start
To stop the nfs service type: /etc/rc.d/init.d/nfs stop
To restart the nfs service type: /etc/rc.d/init.d/nfs restart
To have the nfs service start automatically on bootup do this:
change to the /etc/rc.d/rc3.d directory
change the K20nfs file to S20nfs (type: mv K20nfs S20nfs)
To mount this shared directory from/on a remote Linux box, login to the remote box and do this:
Make the mount point (e.g. mkdir /mnt/remote)
Then type: mount servername:/directory /mnt/remote
where "servername" is the name of the box where the directory actually
exists (in this case 192.168.x.x).
000124
11/06/06
To have the ssh server start on my DSL (Debian) box I added this line to the /opt/bootlocal.sh script:
/etc/init.d/ssh start
000125
11/23/06
To use the mget ftp command to download multiple files without having to answer yes to each one, do this:
Login to ftp with the -i switch. e.g. -
ftp -i pcgramps.com
Then to download all the files from one directory type: mget *
000126
03/02/07
To install the sshd (secure shell daemon) on my Debian server I did this:
apt-cache search sshd
(This listed all the available packages with "sshd" in the description.)
apt-get install ssh-krb5
(This installed the sshd package.)
I answered the questions during the install as I wanted and when it finished it started up the sshd daemon.
000127
03/02/07
The default directory holding Apache web server docs on a fresh Debian install is /var/www/apache2-default.
To change the default directory to /var/www like my Fedora/Redhat systems default to I did this:
Put a pound sign (#) in front of the "RedirectMatch ^/$ /apache2-default/" line in the
/etc/apache2/sites-available/default file.
Options Indexes FollowSymLinks MultiViews
AllowOverride None
Order allow,deny
allow from all
# This directive allows us to have apache2's default start page
# in /apache2-default/, but still have / go to the right place
# RedirectMatch ^/$ /apache2-default/
000128
07/24/07
To see the current list of keyboard shortcuts for the particular version/theme of KDE you are in, go to
the "K" Start button (I don't know what this button is officially called in Linux/KDE),
Control Panel, Regional & Accessibility, Keyboard Shortcuts. Now you can see them and edit them (see below).
000129
07/24/07
To edit keyboard shortcuts in KDE v 3.5 open the Keyboard Shortcuts
in Control Panel (see above), pick the item you wish to
edit, then select from None, Default, or Custom. You may need to click
on Advanced if it's not already in use. In advanced, to use a keyboard
combo with a pause between strokes (i.e. Alt+Spacebar, then the letter
X) choose the Multi-key Mode option.
000130
07/24/07
To install Debian with KDE instead of Gnome, when you boot with the install disk, at the "boot:" prompt type: install
tasks="kde-desktop,standard" and follow instrucs from there.
To install with xfce instead, do the same only use install tasks="xfce-desktop,standard".
On the Debian "Lenny" version (version after 4.0 "Etch"), at the install prompt, press the Tab key and add "desktop=xfce" to the command line for Xfce or (I assume) "desktop=kde" for KDE.
000131
08/07/07
To setup my webserver on an old PC using a DSL live CD I did this: (I'm assuming the NIC is working w/an IP address ok.)
(Since it is running off of a read-only CD, it's almost impossible to hack or hi-jack.)
Boot with the DSL CD and hit F2 at the "boot:" prompt so I can choose my comand line options.
Type "dsl option1 option2 etc." (e.g. boot: dsl vga=normal dma noapm noapic)
Follow the prompts to setup xwindows settings and load xwindows.
Do a Ctrl + Alt + Backspace to exit xwindows.
Type "sudo su" to change to the root account.
Do an "adduser name" of account I use on my server and change the password to match what this password normally is.
Change the dsl account password by typing passwd dsl.
Change the root account password.
Do a chown -R username:user /opt/monkey/htdocs
so the "username" account can ftp files later. You
may get an error that says "no such file" or similar. Ignore.
Exit from the root account back to the dsl account and type startx to get back into xwindows.
Right click on the Desktop and go to System > Daemons > Monkey Web Server > monkey start.
Right click on the Desktop and go to System > Daemons > FTPd > betaftpd start.
From my computer where I keep the master copies of my Gnulife
web files, ftp to this DSL box and put the needed files in the
/opt/monkey/htdocs directory.
Get in to the router admin application and set it up so that http port forwarding is going to and from this DSL box.
Test to make sure it is working.
000132
09/19/07
To reconfigure xwindows from a command line on Debian 4.0 (Etch) type: "dpkg-reconfigure xserver-xorg"
(or "xorgconfig" depending on which works) as root and follow the instructions.
000133
09/21/07
To install fonts on your system do this:
Click on the K Menu and select CONTROL CENTER. In the window that comes up,
click on SYSTEM ADMINISTRATION, then FONT INSTALLER. You will have to click
ADMINISTRATOR MODE and provide the root password. Then, click ADD FONTS and browse
to the font you wish to install. Select the font and click OPEN. KDE installs the
font. When finished, close the window.
(with most recent/fuller distros you can add TTF fonts this way easily.)
000134
10/11/07
To clone a Linux hard drive with the dd command use these instructions: dd_cloning.txt
000135
10/19/07
To toggle between full screen mode and back in a VMware session do this:
Ctrl + Alt + ENTER = Full Screen
Ctrl + Alt = Full Screen Off
000136
11/26/07
To make a backup copy of your Master Boot Record do this:
Boot your system with a Linux boot disk (floppy disk like TomsRtBt or CD like Knoppix)
From a command prompt with root privileges type:
"dd if=/dev/hda of=/your-path/mbr_backup bs=512 count=1" where
"/your-path/" is the path to the location you are going to save the
file and "mbr_backup" is the name of the file you choose to save to.
If you need to use this later to restore your Master Boot Record you would again boot with a bootable Linux disk and type:
"dd if=/your-path/mbr_backup of=/dev/hda".
(This assumes your hard drive is an IDE hard drive on the first IDE interface.)
000137
12/14/07
To mount an NTFS file system (Windows drive or partition) in Debian 4.0 Linux follow the instructions
in this document.
000138
12/27/07
To easily share an unsecured KDE desktop session remotely, do this:
Open Control Center > Internet & Network > Desktop Sharing
Under the "Uninvited Connections", check the first, second, and fourth items.

click on pic to see bigger version
Type in a password. BEWARE!!! This will not make a secure connection across the Internet. (To
make a more secure connection, un-check the first item ["Allow
uninvited connections"] and use the "Create & Manage ..." button.)
Now click on the "Apply" button (lower right).
From the remote PC open the remote client app (e.g. vncviewer
or krdc) and use the combination of the computer name or IP address
followed by a colon and the display number (typically 0). Typical
example might be 192.168.1.101:0. You should then be asked for the
password you chose. Enter the password and the remote session should
display.
or from my EEE PC (9/12/08)
Launch > Applications > System > Remote Desktop Sharing > Share My Desktop
click on the "Configure" button at the bottom
check the "Allow Uninvited connections" box
configure settings as desired in the "Uninvited Connections" area
type in a password and click OK.
To prepare the remote desktop (server) from the system you want to remote from (client), do this:
Open a terminal session (e.g. konsole)
Type: ssh -X userid@remotedesktop (where "userid" is either
"root" or the acct you want to login with and "remotedesktop" is the
system you will be remoting to [server]) and type the password when
asked.
Type: krfb to open the Remote Desktop Sharing utility on remote system.
Follow the instrucs from above.
000139
01/11/08
When using the "dd if=/dev/zero of=/dev/sda bs=1048576" command to
low-level format a 60Gig (scsi) drive it took just over 51 minutes.
Based on this it went about 1.18 Gigs per minute. This might give a
general idea of how long it will take on other drives.
000140
01/22/08
To convert text files back and forth between Linux format and DOS
format use the "unix2dos" and "dos2unix" commands from the "tofrodos"
utility. On my Debian system I had to install the "sysutils" package or
the "tofrodos" package. (e.g. "sudo apt-get install sysutils") Then to
convert the particular text file, go to a terminal session (e.g.
"konsole" or Ctrl+Alt+F2), move to the directory where the text file is
and type "unix2dos filename.txt" to convert the Linux filename.txt file
to a Dos format or "dos2unix filename.txt" to convert Dos to Linux.
000141
01/24/08
To resize the icons on the toolbar (bottom panel) in KDE, open
Control Panel > Desktop > Panels and click on the drop down arrow
in the "Size" option.
Pick the size of your choice and click on "Apply".
000142
01/24/08
To edit the menus in KDE go to Control Panel > Desktop >
Panels and click on the "Menus" tab. Then click on the "Edit K Menu"
button in the "K Menu" section and edit the menus as desired.
000143
02/12/08
To import and export address books in and out of Evolution you may
need to use a go-between application like Kaddressbook. Evolution has
an "Import" function under "File" but no "Export" function. Instead it
has a "Save As" but will only save in a "Vcard" format. (Seems pretty
stupid when so many other email clients have the ability to export to
other formats.) To export an address book to a .csv or .ldif format, do
a "File > Save As" to a vard (.vcf) formatted file. Then import that
saved .vcf file from KaddressBook (usually under "Kmenu > Office
> KAddressBook"). Now export that to the format of your choice and
you can import that into the email client of your choice.
To save multiple Evolution address
books (for importing to another PC or restoration after a crash, etc.)
you will need to export each one. Then recreate the appropriate new
address books on the new/restored version of Evolution and import the
.vcf files into the new address books appropriately.
000144
02/12/08
To have all the various window buttons (Mail, Contacts, Calendars,
etc.) available in Evolution in the lower left corner, go to "View >
Switcher Appearance" and uncheck the "Hide Buttons" box.
000145
02/13/08
To have the NumLock key on by default when entering KDE, go to
Kmenu > Control Panel > Peripherals > Keyboard and activate
the "Turn on" option. Then be sure to click the Apply button at the
bottom.
000146
03/03/08
To quickly view, add, or edit your CUPS printers, in your browser location box type: http://localhost:631 and hit Enter. (The Common Unix Printing System is what most Linux distros use now-a-days for printers.)
000147
03/18/08
To copy a file from one Linux box to another you can use the "scp" command which uses "ssh" security. To copy the file "goober.txt" from the "/home/goober" directory on your PC to the "/var/www" folder on "server2" you would type this from your PC: "scp /home/goober/goober.txt server2:/var/www"
Use the "man scp" command for further instructions.
000148
04/13/08
To configure your network settings in Debian from a command line you need to edit the /etc/network/interfaces file.
To use DHCP make it like below.
# The primary network interface - use DHCP to find our address
auto eth0
iface eth0 inet dhcp
For a Static IP address edit the same file similar to this only using the addresses you need:
# The primary network interface
auto eth0
iface eth0 inet static
address 192.168.3.90
gateway 192.168.3.1
netmask 255.255.255.0
network 192.168.3.0
broadcast 192.168.3.255

(On my EEE PC I did not need the "network" or "broadcast" lines.)
Be sure to edit your /etc/hosts file to match your static IP address.
Once finished editing, type this command to restart your networking:
/etc/init.d/networking restart
If that doesn't work you may need to reboot.
000149
04/14/08
To create and manage Logical Volumes (LVM) see this document.
000150
05/25/08
Yum commands for installing, removing, etc., RedHat/Fedora/Centos applications.yum_commands.htm
, yum_HOWTO-11.html, or a summary here.
000151
07/06/08
If you can't mount a usb device with /dev/sda1, sdb1, etc. try using /dev/uba1, ubb1, etc. instead.
000152
08/15/08
Click on the link below for a list of Knoppix Live CD cheatcodes
(parameters you can use when booting a Knoppix Live CD to help boot
properly)
Knoppix_Cheat_Codes.html
000153
08/21/08
To copy a DVD (especially a bootable DVD) using K3b do this:
Open the main window of K3b
Click on Tools > Copy DVD and follow procedure from there.
000154
08/21/08
To make an iso file from a DVD using K3B do this:
Open the main window of K3b
Click on Tools > Copy DVD
Check the "Only create image" option in the "Options" section.
Follow procedures from there.
000155
08/21/08
To switch a EEE PC from "Easy Desktop Mode" to "Full Desktop Mode" do this:
Ctrl+Alt+T (to open a terminal session)
Type "sudo -i" or "sudo su" (to login as root)
Type "apt-get update" if you haven't already updated the sources. (This assumes you have a live internet connection.)
Type "apt-get install ksmserver kicker" and follow directions to finish these installs.
reboot
Once logged in, start to logout, but choose the "Full Desktop" option before rebooting.
000156
09/08/08
To protect my Linux system from someone ssh'ing in as root, I did this on my Debian 4.0 system.
Logged in as root in a terminal session.
Edited the "PermitRootLogin yes" line in /etc/ssh/sshd_config (not ssh_config) to say "PermitRootLogin no".
Typed: "ps -ef | grep sshd" to find the pid number for the /usr/sbin/sshd process.
Typed: "kill -9 xxxx" where "xxxx" was the pid number of /usr/sbin/sshd.
Then typed: "/usr/sbin/sshd" to restart the sshd process again with the new rule.
000157
09/13/08
To replace the Gnome desktop environment with KDE look at this document.
To install/remove various desktop environments look at this document.
000158
02/08
To run an Xwindow app remotely on another user's Linux box do this:
1. From an xterm (or konsole) session on your PC type "xhost +"
2. From a second xterm (or konsole) session on your PC do an "ssh
-X" to the user's PC (e.g. "ssh -X root@computer1") or an Xrsh (e.g.
Xrsh root@computer1") if Xrsh is available.
3. If the X app you need to run needs to be run as the user, do an
"su" with the user's filenumber (e.g. "su user123") to be logged in as
the user.
4. Now type the command you want to run (e.g. kmenuedit) and it should open on your display.
To run an Xwindow app remotely on another user's HP-UX box do this:
1. From an xterm (or konsole) session on your PC type "xhost +"
2. From a second xterm (or konsole) session telnet to the HP-UX box and login as root.
3. From this second terminal session which now has you on the
remote PC, type: "DISPLAY=mycomputer:0" and ENTER, where "mycomputer"
is the name of the PC you are working from.
4. Now type "export DISPLAY" and ENTER.
5. If the X app you need to run needs to be run as the user, do an
"su" with the user's filenumber (e.g. "su user123") to be logged in as
the user.
6. Now type the command you want to run (e.g. kmenuedit) and it should open on your display.
To login to a remote HP-UX workstation with it's full xserver
desktop, from your F1 console (ctrl+alt+F1) type; X -query
hostname.a1b2c3d4.com :1
000159
2/28/08
To change your Redhat dual-display setup so your desktop spans both screens or doesn't span both do this:
Open an xterm/konsole session.
Do an "su -" and enter the root password.
Type "system-config-display" to open the Display settings.
Go to the "Dual head" tab.
Change the "Desktop layout option as desired and click OK.
Exit the xterm/konsole session.
Logout of Xwindows and restart the Xserver.
OR
To configure a Linux system so apps can move across displays add
these two lines at the bottom of the 'Section "ServerLayout"' section
in the /etc/X11/xorg.conf file if they aren't there already.
Option "Xinerama" "on"
Option "Clone" "off"
If they are already there, make sure the Xinerama line is set for "on".
000160
3/7/08
One way to easily kill an application in KDE that won't exit
normally is to type Ctrl+Alt+Esc and then use the skull and cross bones
to click on that app you want to kill. BE CAREFUL WHERE YOU CLICK! PDW
03/07/08
000161
3/10/08
To add or configure a printer on a Redhat workstation, remote to
the box (e.g. ssh root@remote-pc) and run the "printconf" command. If
that doesn't work, try "system-config-printer". This is a handy way of
giving a user another printer to use when their default printer isn't
working.
000162
3/17/08
Symp: Switching back and forth between a text display application
and a graphical app (e.g. between elinks -> Mozilla) causes the
graphical display to be missing pixels on one of the multiple monitors.
Graphics look like they are displayed in 620x480 instead of higher
resolution. Then the display will resolve itself. I swapped video
adaptor and reseated others with no results.
Cause: The /etc/X11/xorg.conf file is not configured correctly.
Specifically the "Defaultdepth" setting in the 'Section "Screen"'
section is set in-correctly. This was originally accomodating an older
8 bit color app.
Res: Back up the current /etc/X11/xorg.conf file first. Edit the
/etc/X11/xorg.conf file by remming out the "Defaultdepth 8" line and
un-remming the "Defaultdepth 24" line in the 'Section "Screen"'
portion. Then have user logout and back in to Xwindow session.
000163
3/19/08
How to install Xerox print drivers for Linux cups printing on Redhat system
download the Xerox (LinuxCups*) package from the Xerox website.
before unzipping, cd /usr/share/cups/model
mkdir Xerox
cd /tmp
tar -xvf **this will create a subdir with all xerox.ppd's.**
cd to subdir and, mv * /usr/share/cups/model/Xerox
cd /etc/init.d
./cups stop
./cups start
Then connect to CUPS web interface (http://localhost:631) and [add/modify] printer to use appropriate Xerox driver.
[Configure] printer to correct tray assignments and such.
000164
5/5/08
To get a login history on a particular Linux or Unix system, login as root and type "last" (or "last | more").
000165
10/04/08
When using an xterm session, here are three sets of menu options to use with the Ctrl button and your mouse:
Ctrl + left for Main Options
Ctrl + right to select Font
Ctrl + middle for VT Options
000166
10/04/08
Instructions for using wget to download a whole website. wget.en.t2t
000167
10/04/08
To find the 10 biggest folders in your current working path:
du -x --block-size=1024K | sort -nr | head -10
(Don't expect a quick response. It has to do some work!)
000168
10/04/08
To install java in Fedora Core 9 do follow these instrucs:
java-fc9.htm
000169
10/04/08
Tips and Tricks for Fedora Core 9 - f9-tips.htm
000170
5/9/08
To remotely configure a RedHat Linux box to share a on another machine that has the printer connected locally, do this:

   1. Open a terminal session and type: "xhost +"
   2. Open a second terminal session and type: "ssh -X root@remcomp" where "remcomp" is the name of the system you are trying to configure.
   3. Type: "system-config-printer" to run the printer configuration utility.
   4. If there is already an lp0 entry listed, double-click on it to edit the settings (or click once and then click on the Edit button).
   5. Under the "Queue name" tab make sure the "Name" field is "lp0" and the "Short description" can be anything, but I it might be best to use the lpx naming convention.
   6. Under the "Queue type" tab use one of these combinations (not sure at this time why one works one place and other works elsewhere):
         1. "Queue type" = "Networked UNIX (LPD)", "Server" = remote hostname, and "Queue" = "lp0" (for this method to work, the LPD protocol must be enabled on the remote workstation. See note below.)
         2. "Queue type" = "Networked CUPS (IPP)", "Server" = remote hostname, and "Path" = "printers/lp0"
   7. Go to the "Printer driver" tab and make choose the correct driver.

                          OR

   1. Open a terminal session and type: "xhost +"
   2. Open a second terminal session and type: "ssh -X root@remcomp" where "remcomp" is the name of the system you are trying to configure.
   3. Type: "firefox" or "mozilla" to open a browser.
   4. From the browser type: "localhost:631" in the URL box.
   5. Click on the "Printer" link or "Manage Printers" link (same thing).
   6. For the lp0 printer click on the "Modify Printer" link.
   7. Enter the root account and password.
   8. The "Location" field should be "lp0". "Description" probably already says something like "Created by redhat-config..." Click on the "Continue" link when ready.
   9. The "Device" field should be set to "LPD/LPR Host or Printer". Click on the "Continue" link when ready.
  10. The "Device URI" field should be "lpd://compwithprntr/lp0" where "compwithprntr" is the name of the machine that the printer is physically connected to. Click on the "Continue" link when ready.
  11. Set the "Make" field according to the printer manufacturer. Click on the "Continue" link when ready.
  12. Set the "Model" field to match the model of the printer or the closest to it. Click on the "Continue" link when ready.

In order to use the "Networked UNIX (LPD)" queue type in step 6 above the LPD protocol must be enabled on the system attached physically to the printer. To do this run the "system-config-printer" utility on this system and go to the "Queue type" tab. Click on the "Sharing" button and then on the "General" tab. Check the "LPD" tab and OK your way out.
000171
10/17/08
When I wanted to change my "Kmenu" start button to something else, here's what I did.
Created the button I wanted and matched it in size to the current
kmenu.png icon that was being used. In my case it was using the
/usr/share/icons/kdeclassic/32x32/apps/kmenu.png icon.
Opened a terminal session as root and changed to the /usr/share/icons/kdeclassic/32x32/apps directory.
Moved the current kmenu.png file to kmenu.png.orig (mv "kmenu.png kmenu.png.orig").
Copied the replacement file I wanted to this direcotry as "kmenu.png" (e.g. "cp /data/temp/newicon.png kmenu.png" [Since I was already in the correct directory I didn't have to use the full path to the target])
Closed all apps and then exited my xsession with Ctrl+Alt+Del
then restarted xwindows from the login screen with Ctrl+Alt+Backspace.
Logged in and there was the new icon in place of the Kmenu icon.
000172
11/05/08
To set links in Icedove to open in Iceweasel by default (instead of Konqueror), from inside Icedove, go to Edit > Preferences > Advanced > General > Config Editor and type 'http' in filter line. Then either change or add 'network.protocol-handler.app.http' and use '/usr/bin/iceweasel' as value. Do the same for 'https'.
000173
11/05/08
To configure Iceweasel "mailto:" links to use Icedove for emailing, do this:
Type 'about:config' in URL box.
Then type 'mailto' In 'Filter' box and either change 'network.protocol-handler.app.mailto' string field to '/usr/bin/icedove' or whichever mailclient/path you wish to use.
OR ADD 'network.protocol-handler.app.mailto' as 'string' and put '/usr/bin/icedove' as 'value'. To add, right click in empty space in about:config window and select 'string'.
000174
11/27/08
To install Debian with the Xfce desktop manager on my EEE PC I used these instructions
using a memory stick. When I first booted and got to the first menu I
pressed the tab key and added this to the end of the command prompt:
"desktop=xfce". Then during the install process when given a list of
packages to choose from, I picked "desktop", "laptop", and "Standard
system". I used my home wireless connection during the install and
never had to configure wireless after completion. This document should explain how to configure wifi after install if needed.
000175
12/06/08
To install Xfce instead of Gnome or KDE with Debian 4.0 (Etch), at the install prompt type: install tasks=xfce-desktop
To install KDE instead of the default Gnome desktop manager, type: install tasks=kde-desktop (or install tasks="kde-desktop,standard")
000176
12/08/08
One way to create desktop icons in the Xfce4 desktop is to install
the "xfce4-appfinder" application. Once you install it (e.g. "apt-get
install xfce4-appfinder") you run and drag and drop apps to the desktop
to make icons there.
000177
12/10/08
To stop and start networking on a Debian system type this as root:
# /etc/init.d/networking stop
# /etc/init.d/networking start
or
# /etc/init.d/networking restart
000178
12/16/08
Read this article for an easy way to rip CDs in KDE.
http://docs.kde.org/userguide/audio-cd.html
This version skips the first section and may not be needed if your system already has the needed apps/configuration in place.
rip-cds.htm
000179
12/19/08
To disable IPV6 in Debian do this:
sudo vi /etc/modprobe.d/aliases
Find the line: "alias net-pf-10 ipv6"
change to: "alias net-pf-10 off"
If the above change is not working you need to change the line to: "alias net-pf-10 off ipv6"
Save the file and reboot
000180
12/27/08
To make it easier to find and configure wireless hotspots from
within Xfce on my EEE PC I installed the WiFi Radar application with
the "apt-get install wifi-radar" command.
000181
01/07/09
To create a shortcut key to open konqueror automatically to the /data directory, I did this:
Opened kmenuedit (Kmenu > Run Command > kmenuedit and ENTER
Created a new item in the sub-menu of my choice
Typed this command in the "Command" box: konqueror --select /data/
Set the "Current shortcut key:" to the keyboard combo of your choice. (I used the Windows key + E to make it consistent with Windows.)
Be sure to save the item, and then you're done.
UPDATE 2/11/13 - You may need to do this:
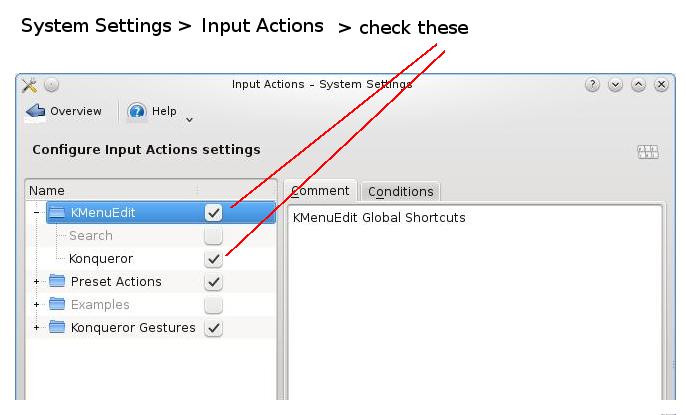
000182
01/21/09
To install Xfce by default when installing Debian on a system, use this installer option: install tasks=xfce-desktop
or
install tasks="xfce-desktop, standard"
000183
02/11/09
To surf the web with graphics on a Linux box w/o Xwindows installed I installed the "links2" application (in Debian: apt-get install links2). Then I had to use the
"-g" and "-mode" options. E.g. "links2 -g -mode 1024x768x256 gnulife.com" opened my Gnulife webpage with basic graphics and color. Not all of the graphics
displayed, but maybe with a better graphics mode selection it would have.
000184
03/01/09
To configure NFS on a home network follow the example below.
--------------------------------------------------------------------------------------------------------------------------------
* The network is configured so that computers are recognized by their hostnames.
* The network is using the 192.168.0.0/255.255.255.0 range of IP addresses.
* "server1" is the hostname of the computer that has the files you want to share with others.
* "client1" is the hostname of the remote computer you will be accessing the files from.
  In other words, you will see the files from this computer, but they will actually be on "server1".
* The directories on "server1" that will be shared are "/network-data" and "/home/all".
* Both "server1" and "client1" have accounts named "user1" that have the same password.
  Make sure "user1" has the needed permissions to the shares on "server1".
* The mount points to be used on "client1" will be "/mnt/nw-data" and "/mnt/all".
--------------------------------------------------------------------------------------------------------------------------------

1. Install "nfs-kernel-server" and "nfs-common" packages on "server1". On a Debian-based system, from a command prompt, type:
   "sudo apt-get install nfs-kernel-server nfs-common" and follow the prompts.  On a RedHat-based system use yum or whatever you prefer.

2. On "server1" you will need to edit the /etc/exports file similar to below:

/network-data		client1(rw,sync)
/home/all		client1(rw,sync)

         or if there are more than two computers use:

/network-data		192.168.0.0/255.255.255.0(rw,sync)
/home/all		192.168.0.0/255.255.255.0(rw,sync)

3. From a command prompt on "server1" type:
sudo exportfs -a

4. From a command prompt on "client1" type:
sudo mount -t nfs server1:/network-data /mnt/nw-data
    and then,
sudo mount -t nfs server1:/home/all /mnt/all

5. To have these mounted automatically when "client1" boots up add these two lines to the /etc/fstab on "client1".
server1:/network-data      /mnt/nw-data      nfs        auto,rw,user,sync,exec     0 0
server1:/home/all          /mnt/all          nfs        auto,rw,user,sync,exec     0 0
000185
03/09/09
To clean up old Debian packages taking up space that are un-needed
go to a terminal session as root and use the "apt-get autoremove" command.
000186
03/14/09
To see if Linux detects your scsi or usb scanner run the "sane-find-scanner" command.
000187
03/21/09
To add a second wireless router to my home network I configured it this way:
Plugged the router into a computer that was not on the network
and made sure the router was not connected to my network. Then powered
up the router.
When the router finished initializing, powered up the computer.
Used the browser on this computer to get to the router's web
interface by typing the router's IP address into the browser's address
bar.
(This was a Linksys router and the default IP address was 192.168.1.1. Other common router default IPs are 192.168.0.1, 192.168.0.0, and 192.168.1.0.)
(The default ID/password combo was a blank ID [but "admin" also worked] with a password of "admin".)
Changed the admin password on the router to what I wanted it to be and saved the setting.
Made sure router was configured to get it's WAN IP address via DHCP from my main router.
In this case I left the router's web interface IP address as it was since my main router's IP address was 192.168.0.1. Would have changed it to be different from my other router if needed.
Edited the range of IP addresses it was allowed to hand out and made sure they were using the 192.168.1.x network and not the 192.168.0.x that my main router was already using. Saved the settings.
Configured the wifi encryption/security settings the way I wanted and saved those settings.
Closed the router's web interface.
Powered down the router, waited a few seconds, and powered it back up, then tested.
That was it!
000188
03/27/09
To download a Youtube video do this:
Browse to the Youtube video you want to download.
Copy the URL
From a command prompt change to the directory you want to copy the video file to.
Type the "clive" command, followed by a space and then paste the URL that you copied above.
Press Enter and watch as the download progresses.
I have noticed when the download is complete (it says 100%) you have to hit Enter again to get back to a prompt.
000189
04/08/09
To convert a *.flv media file to an *.mpg file, from a command prompt use the "ffmpeg" command. E.g. - To convert
the CornerGasS1E3.flv file to an mpeg file I type: "ffmpeg -i CornerGasS1E3.flv CornerGasS1E3.mpg".
000190
04/10/09
To determine what version of Ubuntu/Kubuntu/Xubuntu your are running, from a command prompt type: cat /etc/issue or cat /etc/lsb-release for a little more info.
In Fedora, use the cat /etc/issue command.
000191
04/10/09
When preparing to re-install Linux on a system and you want to
backup current configurations back up at least these three directories:
/etc, /boot, and /home (or the particular home directory you are interested in). The /home/userid directory will have things like the user's mail files, browser bookmarks, and other settings particular to the user's profile.
000192
04/23/09
One way to see what plugins are installed in Firefox is to type "about:plugins" in the URL box.
000193
04/23/09
To set my Thunderbird email icon so it would open the profile manager (this allows me to pick between my various email accounts when I open it) I had to add the "-profilemanager" option at the end of the "thunderbird" command. So here are the steps I did, in order, on my Kubuntu 8.04.1 system:
Clicked on the Kmenu button in the lower left-hand corner to open the Kmenu, then found Thunderbird in the "Internet" menu.
Right-clicked on the Thunderbird icon and chose to add it to the desktop (or the main panel).
Right-clicked on the Thunderbird icon in the Main Panel or Desktop where I put it and chose to "Configure ..."
Clicked on the "Application" tab.
In the "Command" box I removed the "%u" (don't know if that was necessary) and replaced it with " -profilemanager" so together it read "thunderbird -profilemanager". (There is one space and one " - " between the two words.)
000194
04/30/09
To configure KDE on my Kubuntu system to have a particular
application open automatically (autostart), I did a little research and
came up with these several methods. I chose the third, but haven't
experimented with the first two yet.
1. Open up Konqueror. Navigate to your home folder.
2. Click on View. Select Show Hidden Files.
3. Look for a folder named .kde and open it.
4. Look for a folder named Autostart and open it.
5. Right click inside Konqueror. Select Create New and Text File.
6. Give the text file the name of the program you would like to autostart.
7. Open the file using Kate or the text editor of your choice.
8. Type #!/bin/bash on the first line.
9. Type the command to launch your program along with any necessary switches.
10. Save the file.
11. Right click on the file, select Properties and the Permissions tab.
12. Finally, check the is executable box and click OK to complete the process.
or
1. Open up Konqueror. Navigate to your home folder.
2. Click on View. Select Show Hidden Files.
3. Look for a folder named .kde and open it.
4. Look for a folder named Autostart and open it.
5. Click on the K Menu icon and navigate to the program that you would like to auto-start.
6. Drag the icon for said program into the Konqueror window and select Copy Here when prompted.
or
1. Install "kcontrol-autostart" (e.g. - sudo apt-get install kcontrol-autostart)
2. Run "kmenuedit" and add the "kcontrol" command where you want it.
3. Use the Kmenu button to open your Kmenu and start up "kcontrol" from where you put it.
4. Choose the "Autostart Manager" under the "KDE Components" and add the application you want to start automatically.
Note: After you add an item this way, you'll see a new text file in your ~.kde/Autostart directory.
000195
05/28/09
To find out what PCI hardware you have in your computer, open a terminal session and type "lspci | more".
You can pipe the output through grep to find some specific PCI device like a video card or ethernet card.
e.g. "lspci | grep -i vga" or "lspci | -i grep graphic" or "lspci | -i display" should give you your video card.
e.g. "lspci | grep -i ethernet" should give you the name of your network card.
e.g. "lspci | grep -i audio" will probably give you your sound card info.
000196
05/28/09
To find out what directory a particular command is located in, type: "which command" where "command" is the name of the particular command you are looking for. (e.g. "which cron" tells you where the cron command is located.)
000197
05/29/09
Once you have installed madwifi, the commands it creates for you to use are "wlanconfig" and "iwconfig". See this howto or this one for more explanation.
000198
06/01/09 (update 08/02/09)
To create new icons on the Lxde, Xfce, or KDE desktop I did this:
1. Open the Thunar file manager and go to the /home/userid/Desktop folder
2. Open a second instance of Thunar and go to /usr/share/applications
3. All the files in /usr/share/applications directory are .desktop files.
4. Copy any of these that you want on the desktop to the /home/userid/Desktop directory.
000199
06/01/09
To make a Firefox icon on the Xfce or KDE desktop that opens to a specific web site, do this:
1. Follow the directions above to add the Firefox icon to the Desktop.
2. From the /home/userid/Desktop folder, open the Firefox.desktop file in a text editor.
3. Toward the bottom of this text file is a line like this: "Exec=firefox %u"
4. Add a space and the URL of the web page inside of double quotes.
(e.g. Exec=firefox %u "http://www.google.com"
5. Other application .desktop files can be edited similarly.
000200
06/05/09
To add a user account to additional groups from the command line do this:
usermod -aG group1,group2,group3 userid
e.g. - to add "user1" to the "floppy" group and the "cdrom" group, as root, type:
usermod -aG floppy,cdrom user1
000201
06/22/09
To add a volume control to the taskbar in LXDE do this:
right-click on an empty space on the taskbar
choose "Add/Remove Panel Items"
click on the "Add" button
choose the "Volume Control" item and click on "Add"
000202
07/02/09
To play wave files from the command line, install the "sox" application.
It includes the "play" command that you can use to play a *.wav file from
the command line. The syntax is: play file.wav
To install sox on a Debian system from the command line, type: apt-get install sox
000203
07/09/09
To add or remove services that start during bootup on a Debian 5 system (as well as older versions), use the "update-rc.d" command.
e.g. - To remove the "netatalk" service, first shut the service down with "/etc/init.d/netatalk stop", then "update-rc.d netatalk remove".
000204
07/18/09
To make a video recording of things on your desktop, do this:
Install "recordmydesktop" (e.g. "apt-get install recordmydesktop" or use Synaptic).
Click on "Kmenu", then "run command" or use "Alt + F2".
Type the "recordmydesktop" command followed by the path and
filename.ogv where you want to store the video, and press "Enter". (e.g.
"recordmydesktop /home/user1/myvideo.ogv") Be sure to use the ".ogv"
file extension since these are ogg formatted files.
Now everything you do on your desktop is being recorded.
To end the recording, use the keyboard combo of the left Ctrl +
Alt + S. Then go find your file and play it in Kaffeine or some other
player.
000205
07/21/09
On a DSL box, to switch from one window manager to another edit the /home/userid/.desktop file and restart Xwindows. See the example ".desktop" files below.
wm: fluxbox
icons: dfm
or
wm: jwm
icons: dfm
000206
07/23/09
The actual location of the files in the "Trash" (at least on my Debian and Fedora systems) is /home/userid/.local/share/Trash/files.
Sometimes when this gets to full you need to open a root terminal
session and delete the files in this directory with the "rm" or "rm -rf"
command.
000207
08/23/09
To add or remove services that start up automatically in Debian, use
the "update-rc.d" command or remove the particular linked file in the
specific /etc/rcx.d ("x" is a number) directory. E.g. - "update-rc.d -f netatalk remove" (removes the netatalk service from being started on bootup)
000208
08/23/09
To make a program icon on a DSL desktop, make a soft link in
/gome/userid/.dfmdesk to the program's executable file. To make an icon
inside a folder on the desktop, do this:
1. in a terminal session change to the directory (e.g. - "cd /home/userid/.dfmdesk/foldername") 2. make a soft link to the program (e.g. - "ln -s /usr/bin/myprogram .")
000209
08/23/09
"recordmydesktop" and "gtk-recordmydesktop" are Linux-based programs used to record audio-video sessions on the Linux desktop.
000210
08/23/09
To add a program icon on the desktop in Xfce4 or Lxde do this: 1.
Open a terminal session on change directories to the
/home/userid/Desktop directory. 2. Make a soft link to the particular
*.desktop file of your choice in the /usr/share/applications directory. (e.g. - "ln -s /usr/share/applications/firefox.desktop .")
000211
08/23/09
To create a desktop icon for a program that doesn't have one (e.g.
"Ace of Penguin" games may not have icons), copy an existing *.desktop
file from in /usr/share/applications and rename it to the name of your
choice. Then edit the various lines with that *.desktop file to match
with your program.
000212
10/04/10
To format a drive with the Linux ext3 format do this from a command prompt as root: mkfs -t ext3 /dev/hxa1
where "/dev/hxa1" is the particular drive you are formatting. (i.e.
If you were going to format the first partition, on the master drive, on
the first IDE interface/cable you would type: mkfs -t ext3 /dev/hda1.)
000213
10/15/10
To clean a virus infected computer with a Debian Linux Live CD (Debian, Knoppix, Ubuntu, Kubuntu, etc.) do this:
(This assumes your computer has a working internet connection.)
Boot up the infected computer with the live CD.
Open a terminal session and type: sudo apt-get update and press Enter.
When that finishes type: sudo apt-get install clamtk and press Enter. (Type "Y" for yes and press Enter, when asked to install.)
When that finishes (may take a while), close the terminal session
and find the "Virus Scanner" program in your menu. (For Knoppix is was
under the "Accessories" menu.) Start it up.
Click on "Scan > Recursive Scan" and follow dierections to scan the drive you want to scan.
000214
01/24/11 (it's been a while)
To minimize all applications and get back to the desktop in KDE (I think also in Gnome), use the Ctrl + Alt + D keyboard combination. (Sweet!)
000215
03/01/11
To format a DVD+RW disc from the command line type this: dvd+rw-format -force /dev/dvd or dvd+rw-format -force=full /dev/dvd
You may need to install/update some programs first though.
Debian installation: apt-get install 'dvd+rw-tools' and/or apt-get install mkisofs and/or apt-get install cdrecord
000216
06/20/11
To download a file (e.g. an iso file) from the command prompt
instead of through the browser or via ftp, go to the directory you want
to download to, then type: wget -c URL where URL is the full URL address to the file.
000217
12/30/11
To detect new hardware from the command line in Redhat Linux (Fedora), use the "kudzu" command. In Debian, use the "discover" command. (You may need to install discover. e.g. "apt-get install discover")
000218
02/03/12
To determine what web server application a website is using, from a command line type: lynx -head http://websitename.com,
obviously using the website's domain name. Be sure to use the
"http://" along with the domain name. Also, if "Lynx" is not installed
you will need to install this first.
000219
02/07/12
The VIM cheat sheet
000220
02/08/12
To switch between the current Apache configuration file being used,
and another available one you can use the "a2dissite" and "a2ensite"
commands. E.g. "a2dissite default && a2ensite mysite" disables the "default" configuration and enables the "mysite" configuration. After this change is made run the "/etc/init.d/apache2 reload" command to restart Apache.
000221
02/17/12
To edit a pdf file (e.g. Filling out a form using the computer instead of printing it out and doing it by hand.)
I opened the pdf file in Gimp, saved it in the .xcf format, opened that
file in Kolourpaint, edited it, and then saved and/or printed it. I
could also save it in a jpg or other format.
000222
02/27/12
To enable and disable virtualhosts in Apache webserver use these commands: virtualhost commands
000223
03/06/12
To determine what version of KDE is installed on a Linux workstation, from a command prompt type: konqueror --version
You should see three items listed. 1.)The version of Qt.
2.)The version of KDE. 3.)The version of
konqueror.
In place of konqueror use can use most of the other KDE apps (i.e. kwrite, kwin, kross, kstart, etc.).
000224
03/08/12
To use a keyboard shortcut to minimize all windows and show the desktop in KDE 4.4.5, do this:
Right-click on the Panel Toolbox (lower right corner?) and choose "Add Widgets".
Find the "Show Desktop" widget and double-click on it.
Right-click on the new "Show Desktop" widget that is now on the toolbar and choose "Show Desktop Settings".
Use the "Keyboard Shortcut" optiojn to create the keyboard shortcut of your choice.
000225
03/16/12
To keep a Debian system current with the latest updates, do this as root from the command line:
apt-get update
apt-get dist-upgrade
000226
04/18/12
To determine what version of Ubuntu you are using (from command line), type:lsb_release -a
000227
05/01/12
To be able to ssh from one system to another without having to enter the password each time, do this:
On your local system from your home directory run the ssh-keygen command and accept the defaults.
Now copy the contents of the newly created /home/userid/.ssh/id_rsa.pub file into a file (see next step) on the remote system.
Copy the contents of the above file to a /home/userid/.ssh/authorized_keys file. (Note: you may have to ssh from the remote back to your local machine so the .ssh folder gets created first.)
000228
05/11/12
To run a command in the background, follow these instructions:
A task can usually be started and run as a background task by putting a '&' at the end of the command line.

If a task was started and is running in the foreground, it is still possible to move it to the background without cancelling it. To move a task from the foreground to the background perform the following steps:

    1. CTRL-Z (That is, while holding the CTRL key down, tap the 'z' key) This will suspend the current foreground job (task).
    2. Enter the job control command 'bg'
    3. Tap the 'Enter' key

The job is now running in the background.

Useful commands to see which jobs are still running is the 'jobs' or the 'ps ua' commands. If the 'jobs' command is used, a background jobs can be brought to the foreground with the command fg n where n is the job (not the PID) number.
000229
05/31/12
To find the IP address of a particular domain (from a command line),
use the "host" command followed by the domain name. (e.g host
gnulife.com)
000230
06/28/12
Memcached is:
Free & open source, high-performance, distributed memory object caching system, generic in nature, but intended for use in speeding up dynamic web applications by alleviating database load.

    Memcached is an in-memory key-value store for small chunks of arbitrary data (strings, objects) from results of database calls, API calls, or page rendering.

    Memcached is simple yet powerful. Its simple design promotes quick deployment, ease of development, and solves many problems facing large data caches. Its API is available for most popular languages.
Sometimes this cache needs to be cleared. To do so on a Debian-based box, as root type: /etc/init.d/memcached restart
000231
07/02/12
To list files by date, with most recent at the top, type: ls -lt
To list them in the opposite order, type: ls -ltr
000232
07/17/12
To add a user to the sudoer group, follow instructions in this document.
000233
07/27/12
Some typical command line printer functions are:
lpstat -t - to list print queue
cancel -a lp0 - to clear print queue on lp0
service cups restart - to restart cups service
000234
08/18/12
To make an iso image of a hard drive (in this case Windows XP) I booted with DSL Linux (on the XP system I wanted to make an image of), mounted the XP drive to /hda1, mounted a remote drive to /data2/images (NFS drive), then ran this
command as root: mkisofs -o /data2/images/imagename.iso -R /hda1 which left me with an iso file called "imagename.iso" in my /data2/images on my server.
000235
08/29/12
To determine the version of Ubuntu running and a machine, type this from a command prompt: cat /etc/lsb-release
000236
09/29/12
The current /etc/apt/sources.list file for Mepis (Debian Lenny [5.0]) should look like this:
deb http://archive.debian.org/debian/ lenny main contrib
deb-src http://archive.debian.org/debian/ lenny main contrib
000237
10/25/12
To write a message to users who are logged in, you can use the command write. But before that, you need to check who is logged in, and which terminal they are logged in to. Use who command to see who is logged in, and to what terminal.
This will only work if the other user has "mesg" turned on. (i.e. "mesg y")
First, type:
who
who will list of all user have login and and login to which terminal, you will see something like pts/0, pts/1.
Example output:
aizatto pts/0 2007-03-10 02:21 (:0.0)
With the information, now you can write messages to the user aizatto.
write aizatto pts/0
After typing the command line above, you can start to type your messages. When you hit enter, you message will be send to that terminal. Terminate the write by ctrl+D.
You can cat a file and pipe to write command too.
cat memo.txt | write aizatto pts/0
You can broadcast your message to all logged in users with the wall command if you are logged in as root.
cat announcement.txt | wall
Or simply type wall, then start to write your message. For wall, the message will be send only after you hit ctrl+D. And the message will be send to all users that login including you.
000238
11/12/12
To use "mput" or "mget" in an ftp session without having to answer "yes" or "no" to each file being transferred, type "prompt" to toggle interactive mode off. To turn it back on, just type "prompt" again.
000239
11/19/12
To find all files inside a particular directory, and it's sub-directories, with files whose names contain a particular string, cd to that directory and type: find . | grep yourstring where yourstring is the particular set of characters your are searching for.
(e.g. if I cd to /etc and type: find . | grep network it will find every sub-directory and file with the word network in it.
root@server1:/etc# find . | grep network
./networks
./network
./network/if-post-down.d
./network/if-down.d
./network/if-down.d/upstart
./network/if-pre-up.d
./network/interfaces.orig
./network/interfaces.02
./network/interfaces
./network/if-up.d
./network/if-up.d/upstart
./network/if-up.d/openssh-server
./network/if-up.d/ntpdate
./apparmor/init/network-interface-security
./apparmor/init/network-interface-security/sbin.dhclient3
./init.d/network-interface-security
./init.d/network-interface
./init.d/networking
./init/networking.conf
./init/network-interface.conf
./init/network-interface-security.conf
./sysctl.d/10-network-security.conf
./rc6.d/S35networking
./rc0.d/S35networking
000240
01/14/13
To find the number of files in a directory type this from inside the directory: ls -1 | wc -l
(Notice the switch for the ls command is the number "1" (one) and for the wc command is the lowercase letter "L".
To count all files including inside sub-directories, type: ls -1R | wc -l
000241
01/18/13
To list only directories and not their contents, use the "-d" switch (typically with the -l switch). E.g. - to list all the directories in /etc that start with a "w", type: me@server1:/$ls -ld w*
Which would produce something like this:
drwxr-xr-x   2 root root 4096 2012-06-19 07:22 w3m
drwxr-xr-x 116 root root 4096 2012-06-25 10:29 webmin
-rw-r--r--   1 root root 4496 2010-09-03 10:36 wgetrc
drwxr-xr-x   2 root root 4096 2012-06-05 15:49 wpa_supplicant
000242
01/23/13
To find the closest/fastest Debian apt source server use this command:
netselect-apt
000243
08/11/13
To reset the root password on a VMware ESXi 4.1 and 5.0 system follow these instructions.
000244
09/04/13
To configure a network card from the command line in Redhat 9, as root type: redhat-config-network
000245
09/11/13
To see a list of I/O ports on a Linux system, type this command: cat /proc/ioport
000246 - 09/11/13
To see what IRQs are assigned to what, type: cat /proc/interrupt
000247 - 09/11/13
To restart Clonezilla from the command line, type: ocs-sr -x
000248 - 10/11/13
To copy text in a Putty session, click and drag with your mouse over the text you want to copy. Then, to paste that text, use shift+insert or the right mouse button.
000249 - 10/11/13
To generate an ssh key on the current Linux box, type: ssh-keygen. This creates a couple of files in the /home/userid/.ssh directory. Copy the contents of the new "id_rsa.pub" file from your box to a "/home/user/.ssh/authorized_keys" file on each other Linux box you want to login to. Once you have done this, when you ssh in to these other boxes, you won't have to type in your password each time. (I have noticed that it is very easy to copy the contents from one file to the other and miss the first character. Check to make sure the "authorized_keys" file has the first character from the contents of the other file.)
000250 - 10/11/13
To set up a new Linux box to use LDAP passwords, you must install the libnass-ldap app and follow instructions to set it up.
(apt-get install libnss-ldap)
000251 - 10/11/13
After installing Postgresql on a Linux box, do this:
Set the postgres database password (not the same as the postgres Linux password; leave this blank).
sudo - postgres (logs you into Linux under the "postgres" account)
psql (this puts you at the postgresql prompt)
\password (allows you to set the database password)
\q (exits from postgresql prompt)
As root, edit two files (/etc/postgresql/8.4/main/pg_hba.conf & postgresql.conf)
In the pg_hba.conf file find the "# IPv4 local connections:" section and change:
host all all 127.0.0.1/32 md5
to
host all all 0.0.0.0/0 md5
(This allows everyone to access the database instead of only users on the local machine.)
In the "postgresql.conf" file find the "#listen_addresses = 'localhost'" line and uncomment it and change it to:
"listen_addresses = '*'"
Restart postgresql. (/etc/init.d/postgresql)
000252 - 10/11/13
To assign multiple IP addresses to one NIC on the same PC, see this document here: multiple-IPs.htm
000253 - 10/11/13
To run multiple web sites on one server w/o using virtual hosts (multiple sites-enabled), assign multiple IP addresses to the same NIC (see item 000023 above) and then create a new section for each separate IP in the /etc/apache2/sites-enabled/000-default file. See this file: multiple-servers-one-IP.htm
000254 - 10/16/13
To do a 'find and replace' when editing with the 'vi' text editor, do this:
Press ESC once.
Type the ':' key.
Type '%s/OLD/NEW/g' and ENTER. (Where 'OLD' is the text you want to find and replace, and 'NEW' is the text you want to put in it's place.)
Example: To replace all instances of 'gomer' with 'goober' type the ESC key then :%s/gomer/goober/g and ENTER.
000253 - 02/09/14
To install my wireless Epson XP-310 printer on my Linux PC I did this:
I downloaded Linux drivers from Epson's website.
Installed these drivers as root from the command line.
Had to install lsb from the command line too ("apt-get install lsb").
(In the process of installing these drivers I had to follow some extra instructions in the process. This inclded "apt-get autoremove" at one point.)
Then I opened the CUPS web interface by going to localhost:631, the Administration tab, and selecting the XP-310 printer under the "Networked" printer. Since I had installed the drivers first, the Epson XP ... drivers were now there in the list.
000254 - 02/16/14
In order to transfer files from a Linux PC to my website via a gui interface like Winscp on Windows PCs, I found that I could just use Konqueror. All I had to do was type in the address bar of Konqueror like this:
fish://gooberville.org where gooberville.org is the name of the server I'm trying to transfer to or from.
000255 - 04/08/14
Here is how I prepared the two hard drives for LVM in a Dell server where the drives were GPT types and could not be partitioned with fdisk.
parted-gpt.txt
000256 - 04-10-14
The simplest way to upgrade from one version of Ubuntu to the latest is to run the "do-release-upgrade" command from the command line as root. It is best to do this from the actual computer/server rather than from an ssh session. (I suspect this works for Debian too, but haven't researched yet.)
000257 - 04-14-14 (updated 03-28-18)
To disable Ipv6 on an Ubuntu system read this article: Disable IPV6 in Ubuntu
000258 - 05-04-14
To add a user to the sudo group use the "visudo" command instead of vi or some other editor. Add a line in the /etc/sudoers file with the name of the user followed by ALL=(ALL:ALL) ALL or ALL=(ALL) ALL.
000259 - 05-12-14
To determine what version of Ubuntu is running on a machine, open a terminal session and type: cat /etc/issue
000260 - 05-13-14
To compress a whole directory in Linux using the "tar" command follow the directions here.
000261 - 06-02-14
To install Java 7 on my Ubuntu 12.04 server in preparation for installing hadoop I did this as root:
echo "deb http://ppa.launchpad.net/webupd8team/java/ubuntu precise main" | tee /etc/apt/sources.list.d/webupd8team-java.list
echo "deb-src http://ppa.launchpad.net/webupd8team/java/ubuntu precise main" | tee -a /etc/apt/sources.list.d/webupd8team-java.list
apt-key adv --keyserver keyserver.ubuntu.com --recv-keys EEA14886
apt-get update
apt-get install oracle-java7-installer
I got this info from: here
000262 - 10-01-14
When I install newer Debian or Ubuntu distributions on PCs, there are often not as many screen resolution options available as there should be in the GUI interface.
It used to be that you could edit /etc/X11/xorg.conf file. Not so anymore. So here is how to add extra screen resolution settings.
screen-resolution.htm
000263 01-27-15
To be able to access samba shares on the newer 14.10 Kubuntu server I used the smbpasswd command, e.g. "smbpasswd -a user1" where
"user1" is the name of the user account. I matched the samba password to the Windows account password on the Windows computer(s).
000264 02-26-15
To see the list of reposit directories currently being used on your Debian/Ubuntu system, open the /etc/apt/sources.list file.
000265 05-19-15
To wipe a drive completely and faster than with the "dd" command, install "dc3dd" and then type: dc3dd hwipe=/dev/sdx or dc3dd wipe=/dev/sdx (where x is the letter for the particular drive.)
000266 06-30-15
To see a list of partitions on your system type either: sudo fdisk -l or sudo parted -l
000267 08-02-15
This document explains how to configure an Ubuntu 13 and above system to boot to a command prompt instead of the gui interface. Boot to Command Prompt
000268 10-31-15
To format a USB stick as Fat32 (after you have fdisked it already) you type this from the command line: mkdosfs -F 32 -I /dev/sdx1 (where "sdx1" is the appropriate partition).
000269 01-10-16
To generate an html document that gives your system's configuration/information, from the command line type this: sudo lshw -html > system.html. Then open that file in your browser to see your
system configuration.
000270 01-10-16
To see a list of all the drivers being used in your system, type this from a command line: lsmod.
000271 01-22-16
To determine what kernel version your Ubuntu Linux is using, type this from a terminal window: uname -r
To see a little more info type: uname -a
000272 01-24-14
To add or change desktops in Kubuntu 14.04 read these instructions.
000273 03-08-16
Click on this link to see a list of Ubuntu versions
Click here to see Debian release list
000274 03-21-16
To move between KDE desktops with the keyboard use Ctrl + Alt + right arrow and/or Ctrl + Alt + left arrow to go back and forth.
000275 03-29-16
On my iMac keyboard the Esc key does not funtion in vi/vim to exit out of "Insert" mode. I have to use the Ctrl + [ keyboard combo to exit.
000276 04-07-16
To find the name of installed network cards in Ubuntu 15.10 (maybe earlier versions too), from a command prompt type: ls /sys/class/net
Another way is to type: ip addr
For a extensive information for configuring network settings from the command line, go here: Command Line Network Configuration
000277 4-10-16
To convert a *.3gp audio file to *.mp3 or *.mp4, use this format: ffmpeg -i original.3gp anyname.mp3
Or this: ffmpeg -i Izy-drawings.3gp -ab 64k -ar 44100 -strict -2 Izydraw.mp4
000278 ??-??-16
To install Ubuntu on my Raspberry Pi PC, I did this: RaspberryPi-Ubuntu-install.txt
000279 ??-??-16
To install PelicanHPC iso file to a hard drive use a command like this:
cp pelicanhpc-v2.2+eps-i386.iso /dev/sdh where sdh is the drive you want to install Pelican to.
000280 05-28-16
Here is how to change a Windows XP, Vista, 7, 8, or 10 password with Linux:
Boot with Linux and mount the Windows partition from a command line.
Go to the /Windows/System32 folder
Move the Utilman.exe file to something else as a backup. - e.g. mv Utilman.exe Utilman-exe.orig
Copy the cmd.exe file to Utilman.exe - cp cmd.exe Utilman.exe
Reboot the computer into Windows and at the login screen click on the dotted circle with the two arrows cutting off one corner.
 From the command prompt type: net user to show the names of the various accounts.
Now type net user Username * where "Username is the name of the account you want to change the password for.
Type a new password twice as asked, then type the word exit and press Enter to exit the command prompt.
Use your new password to login.
From the command prompt type: net user to show the names of the various accounts.
Now type net user Username * where "Username is the name of the account you want to change the password for.
Type a new password twice as asked, then type the word exit and press Enter to exit the command prompt.
Use your new password to login.
000281
Newer versions of Linux/Ubuntu show a bunch of /dev/ram stuff when you use the fdisk -l command, there are a couple of ways to just show the hard drive/partition info you want
without the ram junk. Either type: fdisk -l /dev/sd* or lsblk.
000282 06-19-16
To show all the various hardware in your machine, from a command prompt type: lspci -vv
000283 08-26-16
To turn a Synaptics laptop touchpad on or off in Linux, follow these instructions.
000284 01-21-17
To add a printer from a D-Link printer server to your Kubuntu system, follow these instructions
000285 04-12-17
Instead of using "apt-get" you can now just use "apt". (e.g. Instead of "apt-get update", just "apt update". Instead of "apt-get install gooberapp", just "apt install gooberapp".)
000286 05-10-17
To disable a laptop touchpad, open a terminal session and type this command: synclient TouchpadOff=1
To turn it back on, replace the 1 with a 0. (synclient TouchpadOff=0)
000287 05-11-17
To have a particular program/command start automatically when Kubuntu (kxde) starts, add a line in the /home/user/.config/lxsession/Kubuntu/autostart file
with a "@" followed by the command.
000288 05-23-17
How to connect to the internet/network through a terminal session: How to connect via terminal
000289 06-01-17
Here is the way to clone a clonezilla image to a different drive than it came from: clonezilla to different drive
000290 08-19-17
To see the UUID of any hard drives on your system, type this command from a terminal session: blkid
000291 11-06-17
To convert an .amr sound file from an android device, open it in VLC and then convert it to .mp3 format.
000292 11-09-17
If you cannot empty your trash, then use this command:
sudo rm -r ~/.local/share/Trash/files/
000293 11-24-17
To determine the amount of memory on a machine (as well as the amount used/available), open a terminal
session and type the command: free
000294 11-24-17
Here is an article with instructions to tune Linux PerformanceTuning.htm
000295 01-18-18
I wanted to burn a PelicanHPC DVD to my hard drive to make it a permanent install and not have to use a DVD or USB stick. So I booted with my utility USB stick into Hiren's and ran this command from a terminal session. dd if=/dev/sr0 of=/dev/sda.
000296 04-03-18
To use an old android phone as a webcam via Linux or Windows, read this article: Android Phone as a Webcam
000297 05-13-18 To configure Ubuntu to boot to a terminal screen/session, do this:
Edit /etc/default/grub as root.
Set these parameters: GRUB_CMDLINE_LINUX_DEFAULT="text" and GRUB_TERMINAL=console and save the changes.
After saving changes, run these two commands: sudo update-grub and sudo systemctl set-default multi-user.target
Now reboot.
000298 06-04-18 To run multiple commands at one time in a terminal session, see this article.
000299 06-15-18 To edit the grub boot loader via a gui interface, see these instructions.
sudo add-apt-repository ppa:danielrichter2007/grub-customizer
sudo apt-get update
sudo apt-get install grub-customizer
000300 12-08-18 To see the version of Ubuntu from a terminal session, type: lsb_release -a
000301 06-15-19 To make a link on my desktop to a particular file I did this:
From a terminal session I changed to the "Desktop" folder in my home folder.
Then I used the "ln" command: ln -s /location/of/real/file.txt ./file.txt
(I forgot to use the "./" in front of the filename at first and got an error message.)
000302 07-02-19 To update youtube-dl, follow the instructions in this pic: Youtube-dl update
000303 10-02-19 To find info about your wireless card type this from a terminal session: hwinfo --wlan --short
(You can use the hwinfo command for info on all your hardware.)
000304 10-17-19 To delete an un-empty folder from a terminal session use the -R option. E.g. rm -R badfolder ("badfolder" is the folder name).
000305 04-19-20 To install the AnyDesk remote desktop app on Ubuntu/Debian, run these commands as root from terminal session:
wget -qO - https://keys.anydesk.com/repos/DEB-GPG-KEY | apt-key add -
echo "deb http://deb.anydesk.com/ all main" > /etc/apt/sources.list.d/anydesk-stable.list
apt update
apt install anydesk
000306 02-01-21 To configure NFS on your Linux server to share folders with other Linux computers, follow these instructions: How to configure NFS server
000307 09-27-21 To merge multiple mp3 files into one, install the mp3wrap app (sudo apt install mp3wrap) from a terminal session. Then from the terminal session mp3wrap file3.mp3 file1.mp3 file2.mp3 using whatever your mp3 files are named. WHen it finishes there will be an extra mp3 file that is the combination of all the files you added.
000308 10-28-21 To wipe out a hard drive, boot with Hiren's boot disk (or other bootable Linux CD or usb stick) and use this command to wipe off the hard drive. dd if=/dev/zero of=/dev/sda bs=1048576 count=5000
Change "sda" to whatever the drive is you are wiping (sda would be the main drive). The bs= amount can be changed to what you desire and so can the count= amount.
000309 10-32-21 To add a user to the sudoers group (to give the user root access), follow these instructions.
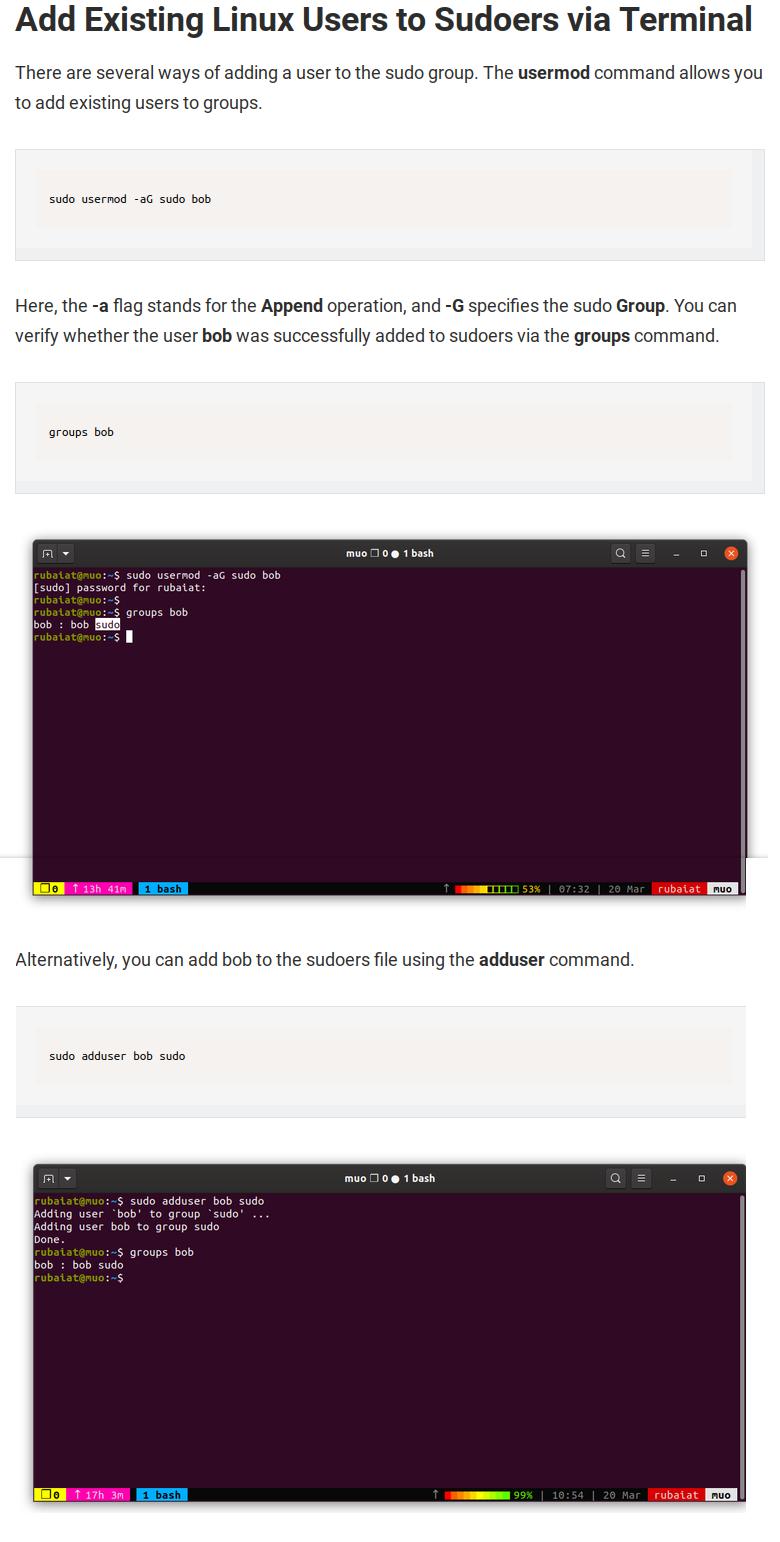
000310
000311
| DOS |
Linux |
Notes |
| ATTRIB (+-)attr file |
chmod <mode> file |
completely different |
| BACKUP |
tar -Mcvf device dir/ |
ditto |
| CD \dirname |
cd /dirname |
almost the same syntax |
| COPY file1 file2 |
cp file1 file2 |
ditto |
| CHKDSK |
df -h |
similar |
| DEL file |
rm file |
beware - no undelete |
| DELTREE dirname |
rm -Rf dirname/ |
ditto |
| DIR |
ls |
not exactly the same syntax |
| DIR file /S |
find . -name file |
completely different |
| EDIT file |
vi file or jstar file |
I think you won't like it, feels like dos' edit |
| EDLIN file |
ed file |
forget it |
| FIND text filename.ext |
grep text filename |
grep has many more options |
| FORMAT |
fdformat, mount, umount |
quite different syntax |
| HELP command |
man command, info command |
same philosophy |
| MD dirname |
mkdir dirname/ |
almost the same syntax |
| MEM |
free -t |
|
| MORE < file |
less file |
much better |
| MOVE file1 file2 |
mv file1 file2 |
ditto |
| NUL |
/dev/null |
ditto |
| PRINT file |
lpr file |
ditto |
| PRN |
/dev/lp0, /dev/lp1 |
ditto |
| RD dirname |
rmdir dirname/ |
almost the same syntax |
| REM > goober.txt |
touch goober.txt |
creates a zero-byte file named goober.txt |
| REN file1 file2 |
mv file1 file2 |
not for multiple files |
| RESTORE |
tar -Mxpvf device |
different syntax |
| TYPE file |
cat file |
same result |
| VER |
uname -sr |
|
| WIN |
startx |
poles apart! |
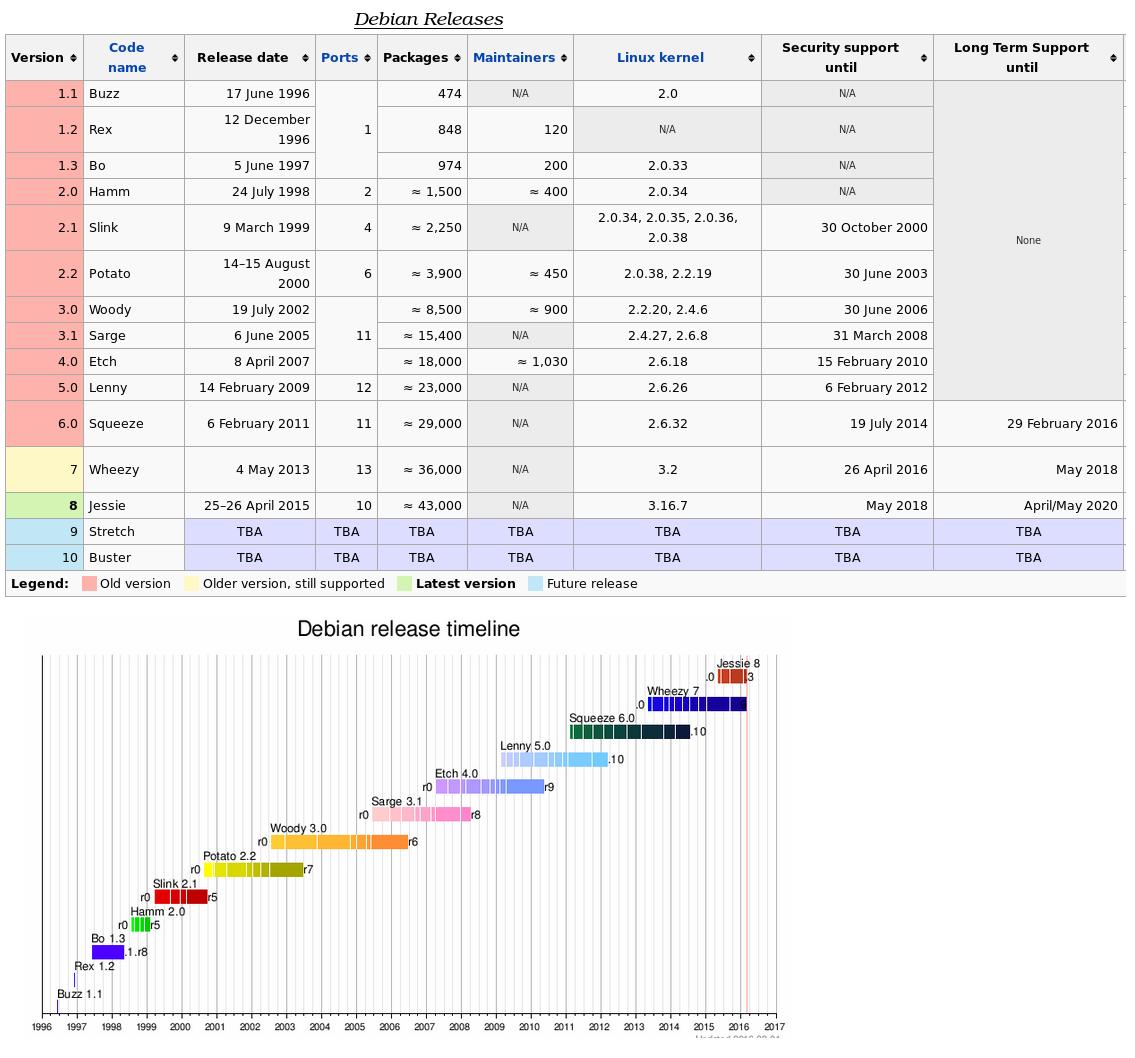
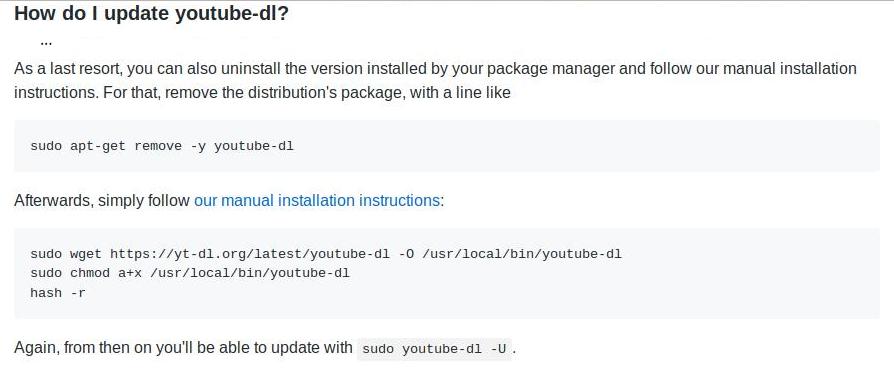