Understanding Network (mapped) Drives
(Paul W. 03/30/07)
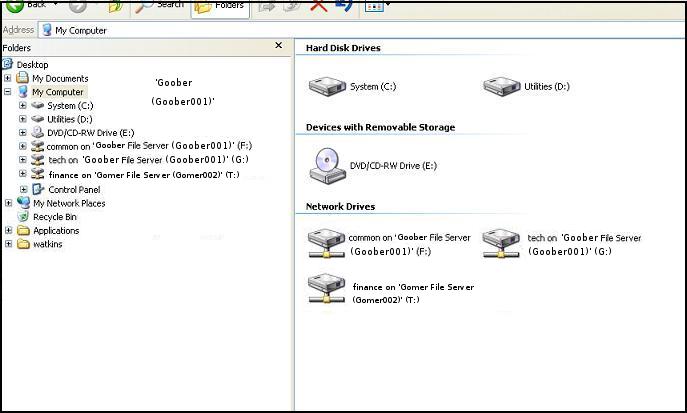
Look at the picture below and raise your hand if you understand what all the text means
that's associated with the network drives. Ok, now keep your hand in the air if you know how to take this information and re-create one of those drives if you lose it somehow. All right, now, if you still have your hand in the air, you can close this web page cause you don't need it. Everyone else, scroll down and keep reading.
So now the question is: "So what?" And the answer is: "You now have the
information you need to map a drive if you lose it some how." Or maybe you need to map a new drive for your new position or new function. Here's one way to do it.
Go to Start > Run
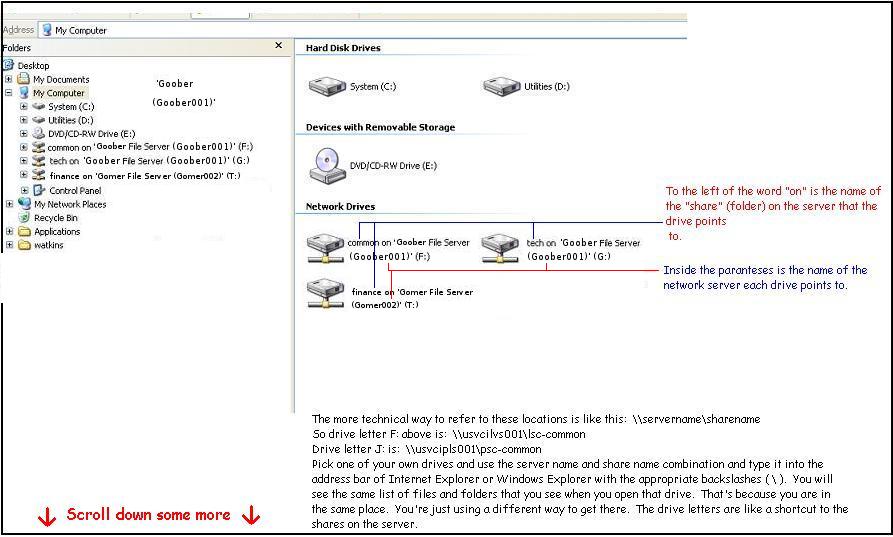
Type in the name of the server starting with the two backslashes ( \\ ). (e.g. \\usvcilvs001) and press Enter. This should open a window showing all the folders, files, and maybe some printers or other things in the "root" of the server.
Navigate to the share (folder) that you need your drive letter to be mapped to and right-click on it.
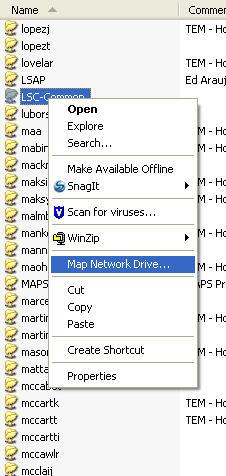
Click on "Map Network Drive ..." to get to the box below.
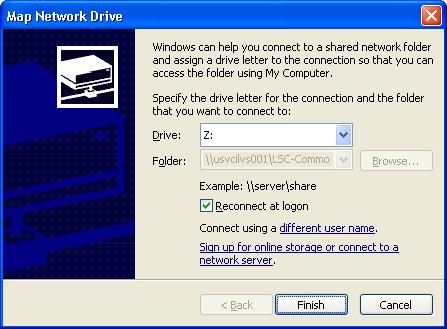
Notice the "Reconnect at logon" box is often checked by default. If you leave it checked, every time you login the drive mapping you've created will be mapped automatically. (so you don't have to re-do it every time) Sometimes you may want a drive mapped just for a short time and you won't want it to re-map every time you login.
NOTE: You don't want to map any more drives than your really need to. The more drives you map and set to re-map automatically, the slower your system will run. Every time you open My Computer it has to "browse" for all the mapped drives. Everytime you go to save a file it has to browse. Every time you open a file it has to browse. The fewer drives there are that have to be browsed, the faster the computer can do the browsing. In other words, don't go hog-wild mapping drives right and left.
Your \\servername\sharename combination should already be in the "Folder:" box.
Click on the drop-down arrow to the right of the "Drive:" box and pick the drive letter you need.
Click on finish and in a few seconds a new window should open listing the folders and files in your newly mapped drive. You can close this window and go back to your My Computer window and the new drive will be there.
Once you have the drive(s) you need, you can take a snapshot of your My Computer window with Snag-It or just with your Print Scrn key and paste it in Word or Paintbrush and save it for future reference. Enjoy!
NOTE2: Be careful not to use a drive letter that is already being used. Depending on how your network account is configured you will get certain network drives automatically through the network login script (runs in the background every time you login in) If you use a drive letter that the login script uses, it may cause some problem or at least some confusion. If you pick letters that are further into the alphabet (say, M-Z) you'll have a better chance of avoiding any conflict. ... Oh ya, if you want to remove a drive you've mapped, just right-click on it and choose "Disconnect".