How to Send Email from the Xerox Workcenter 5755 (Copy Room printer/scanner)
(back to Wiki Tips and Tricks)
1. Load your documents face up in the document feeder input tray. Adjust the guide to touch the documents.
Or...........
Lift up the document feeder. Place the document face down onto the document glass and register it to the arrow at the top right rear corner. Close the document feeder.
2. Press the Clear All (AC) button once to cancel any previous screen programing selections.
3. Press the Services Home button and select the E-mail option. The E-mail features are displayed.
 Note: To use E-mail encryption and signing, ensure that you are logged in at the machine.
4. Select
New Recipients.
5. Select To, Cc or Bcc for the recipient using the dropdown menu to the left of the entry box.
Using the keyboard, enter the E-mail address.
Up to 128 alphanumeric characters can be entered.
To delete a character use the backspace key, or to clear the entire entry select the X button.
Use the Keyboards... button to access additional language keyboards.
Select Add to add the E-mail address to the Recipient list. Continue adding E-mail addresses until all the recipients have been added to the list, then select Close.
All the recipients are displayed in the Recipient list.
Note: If E-mail encryption is enabled, E-mails may only be sent to recipients that have a valid Encryption certificate. Encryption ensures that the message cannot
be read by anybody except the intended recipient.
In addition, with E-mail signing enabled, the recipient can be sure that the
message has actually come from the person
marked as the sender.
If an address book has been setup, enter the name of the recipient and select Search. A list of matching recipients is displayed. Select the E-mail address required
and select Add (To:), Add (Cc:) or Add (Bcc:) from the drop-down menu. The E-mail address is added to the recipient list. Multiple recipients can be added to the
Recipient list in this way. Select Close to exit.
If you are logged in to the machine and your E-mail address is known, the Add Me button will be displayed. Press the Add Me button to add yourself
automatically to the recipient list.
Note: The Add Me button is not visible when the Only Send to Self feature is enabled by the system administrator.
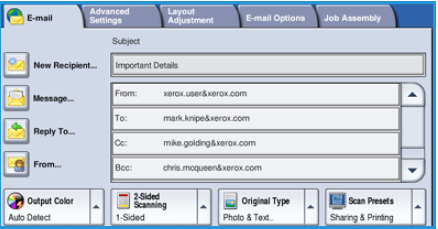
6. Enter the Message, Reply To, From, and Subject details as required.
7. Select the required features for your E-mail using the touch screen:
 Output Color is used to replicate the original colors or to change the output to black and white, grayscale or color.
Note: This feature may not be available on your device.
 2-Sided Scanning is used to select whether your originals are 1-sided or 2-sided. The second side can be rotated.
 Original Type is used to define the original document as text, text and photo, or photo.
 Scan Presets is used to set the scan settings to suit how the scanned image will be used.
8. Press Start to scan your originals and process the E-mail job. Remove the originals from the document feeder or document glass when scanning has completed.
Scan Presets is used to set the scan settings to suit how the scanned image will be used.
8. Press Start to scan your originals and process the E-mail job. Remove the originals from the document feeder or document glass when scanning has completed.
Note: The E-mail job enters the job list ready for sending.
9. Select Job Status to view the job list and check the status of your job.
For information about additional E-mail features, refer to Sending an E-mail on page 171 of E-mail.
(back to Wiki Tips and Tricks)