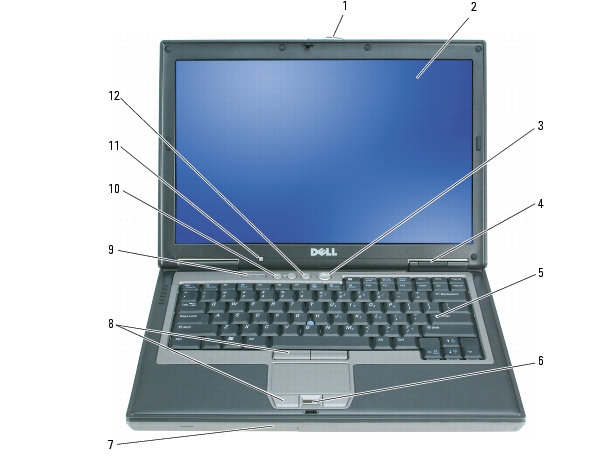
display — For more information about
your display, see Using
the Display.
power button — Press the power button to
turn on the computer or exit a power management mode. See Power
Management Modes.
NOTICE: To
avoid losing data, turn off your computer by performing a
Microsoft® Windows® operating system shutdown rather than by
pressing the power button.
If the
computer stops responding, press and hold the power button until the
computer turns off completely (which may take several
seconds).
device status lights
Turns on when you turn on the computer and blinks when the
computer is in a power management mode.
Turns on when the computer reads or writes data.
NOTICE: To avoid loss of data,
never turn off the computer while the light is flashing.
Turns on steadily or blinks to indicate battery charge
status.
Turns on when wireless devices are enabled.
Turns on when Bluetooth®wireless technology is enabled. To enable or disable
Bluetooth wireless technology, move the wireless switch to the
"on" position. See wireless
switch for more information.
NOTE: Bluetooth wireless
technology is an optional feature on your computer, so the
icon turns on only if you ordered
Bluetooth wireless technology with your computer. For more
information, see the documentation that came with your
Bluetooth wireless technology.
If the computer is connected to an electrical outlet, the light operates as follows:
Solid green: The battery is
charging.
Flashing green: The battery
is almost fully charged.
Off: The battery is
adequately charged (or external power is not available to charge
the battery).
If the computer is running on a battery, the
light operates as follows:
Off: The battery is
adequately charged (or the computer is turned off).
Flashing orange: The battery
charge is low.
Solid orange: The battery
charge is critically low.
keyboard — The keyboard includes a
numeric keypad as well as the Windows logo key. For information on
supported keyboard shortcuts, see Using
the Keyboard.
fingerprint reader (optional) — Helps to
keep your Dell™ computer secure. When you slide your finger over the
reader, it uses your unique fingerprint to authenticate your user
identity. For information on how to activate and use the security
management software that controls the fingerprint reader, see Security
Management Software.
speaker — To adjust the volume of the
integrated speaker, press the volume control buttons, mute button,
or volume-control keyboard shortcuts. For more information, see Key
Combinations.
touch pad buttons/track stick — Provide
the functionality of a mouse. See Touch
Pad for more information.
ambient light sensor (ALS) — Helps to
control display brightness. See for more information, see Using
the Ambient Light Sensor.
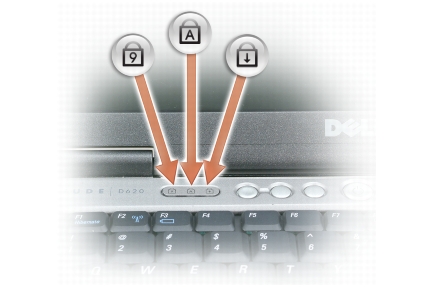
keyboard status lights
The green lights located above the keyboard indicate the
following:
Turns on when the numeric keypad is enabled.
Turns on when the uppercase letter function is
enabled.
Turns on when the scroll lock function is
enabled.
volume control buttons — Press these
buttons to adjust the volume.
mute button — Press this button to turn
off the volume.
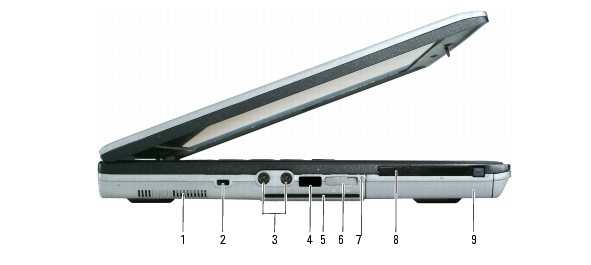
air vents — The computer uses an
internal fan to create airflow through the vents, which prevents the
computer from overheating.
CAUTION:
Do not block, push objects into, or allow dust to
accumulate in the air vents. Do not store your Dell computer
in a low-airflow environment, such as a closed briefcase,
while it is running. Restricting the airflow can damage the
computer or cause a fire.
NOTE: The
computer turns on the fan when the computer gets hot. Fan
noise is normal and does not indicate a problem with the fan
or the computer.
security cable slot — Lets you attach a
commercially available antitheft device to the computer. For more
information, see Security
Cable Lock.
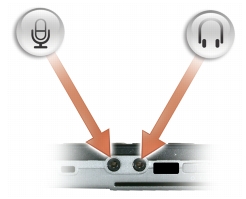
audio connectors
Attach headphones to the
connector.
Attach a microphone to the
connector.
infrared sensor — Lets you transfer
files from your computer to another infrared-compatible device
without using cable connections.
When you receive your computer, the sensor is disabled. You can
use the system setup program (see System
Setup Program) to enable the sensor. For information on
transferring data, see Windows Help, the Help and Support Center, or
the documentation that came with your infrared-compatible
device.
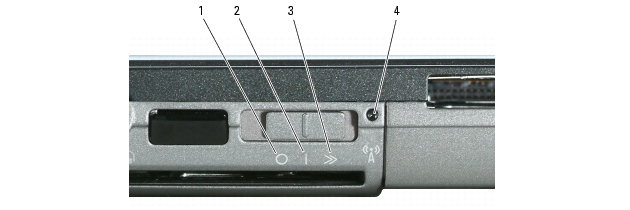
wireless switch — Turns on/off wireless
devices such as Wi-Fi and internal cards with Bluetooth technology
and scans for wireless networks. For more information about scanning
for wireless networks, see Dell™
Wi-Fi Catcher™ Network Locator.
Wi-Fi Catcher™ light — The light
operates as follows:
Flashing green: Searching
for networks
Solid green: Strong network
found
Solid yellow: Weak network
found
Flashing yellow: Error
Off: No signal
found
PC Card slot — Supports one PC Card,
such as a modem or network adapter, or an ExpressCard (with a PCMIA
adapter). The computer ships with a blank installed in the slot. For
more information, see Card
Types.
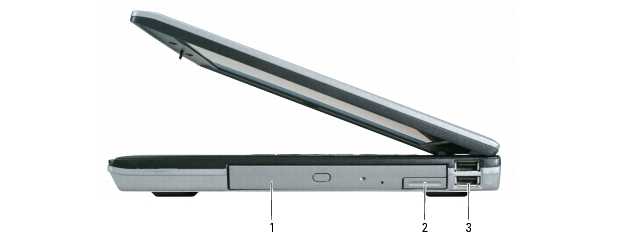
media bay — Supports a floppy or an
optical drive, second battery, second hard drive, or a Dell
TravelLite™ module. See Using
Multimedia.
device latch release — Use the latch
release to eject a device.
USB connectors
Connect USB devices, such as a mouse, keyboard, or printer.
Back View
CAUTION:
Do not block, push objects into, or allow dust to
accumulate in the air vents. Do not store your computer in a
low-airflow environment, such as a closed briefcase, while it
is running. Restricting the airflow can damage the computer or
cause a fire.
NOTICE: The
network connector is slightly larger than the modem connector.
To avoid damaging the computer, do not plug a telephone line
into the network connector.
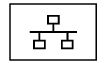
Connects the computer to a network. The two lights next to
the connector indicate status and activity for wired network
connections.
For information on using the network adapter, see the
device user's guide supplied with your
computer.
modem connector (RJ-11)
If you ordered the optional internal modem, connect the
telephone line to the modem connector.
For information on using the modem, see the online modem
documentation supplied with your computer. See Finding
Information.
USB connectors
Connect USB devices, such as a mouse, keyboard, or printer.
serial connector
Connects serial devices, such as a mouse or handheld
device.
video connector
Connects video devices, such as a
monitor.
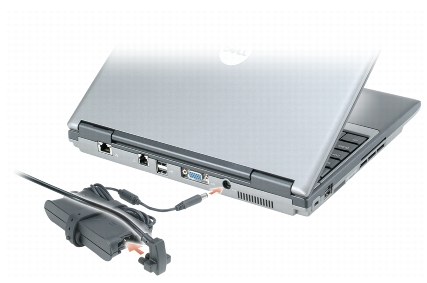
AC adapter connector — Connects an AC
adapter to the computer.
The AC adapter converts AC power to the DC power required by the
computer. You can connect the AC adapter with your computer turned
either on or off.
CAUTION:
The AC adapter works with electrical outlets
worldwide. However, power connectors and power strips vary
among countries. Using an incompatible cable or improperly
connecting the cable to the power strip or electrical outlet
may cause fire or equipment damage.
NOTICE:
When you disconnect the AC adapter cable from the
computer, grasp the connector, not the cable itself, and pull
firmly but gently to avoid damaging the cable. When you wrap
the AC adapter cable, ensure that you follow the angle of the
connector on the AC adapter to avoid damaging the
cable.
air vents — The computer uses an
internal fan to create airflow through the vents, which prevents the
computer from overheating.
NOTE: The
computer turns on the fan when the computer gets hot. Fan
noise is normal and does not indicate a problem with the fan
or the computer.
CAUTION:
Do not block, push objects into, or allow dust to
accumulate in the air vents. Do not store your computer in a
low-airflow environment, such as a closed briefcase, while it
is running. Restricting the airflow can damage the computer or
cause a fire.
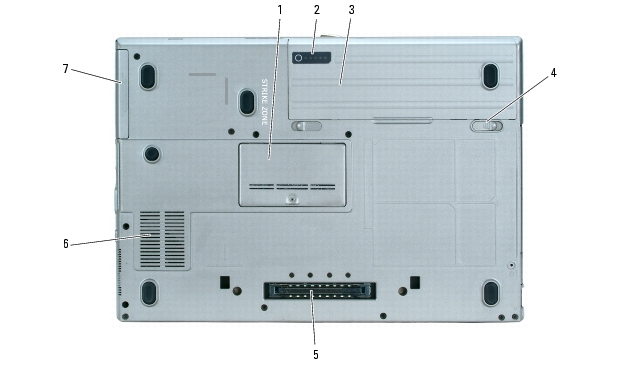
battery — When a battery is installed,
you can use the computer without connecting the computer to an
electrical outlet. See Using
a Battery.
battery-bay latch releases — Release the
battery. See Replacing
the Battery for instructions.
docking-device connector — Lets you
attach your computer to the Media Base or other docking device. See
the Dell documentation that came with your docking device for more
information.
air vents — The computer uses an
internal fan to create airflow through the fan air vents, which
prevents the computer from overheating.
NOTE: The
computer turns on the fan when the computer gets hot. Fan
noise is normal and does not indicate a problem with the fan
or the computer.
CAUTION:
Do not block, push objects into, or allow dust to
accumulate in the air vents. Do not store your computer in a
low-airflow environment, such as a closed briefcase, while it
is running. Restricting the airflow can damage the computer or
cause a fire.